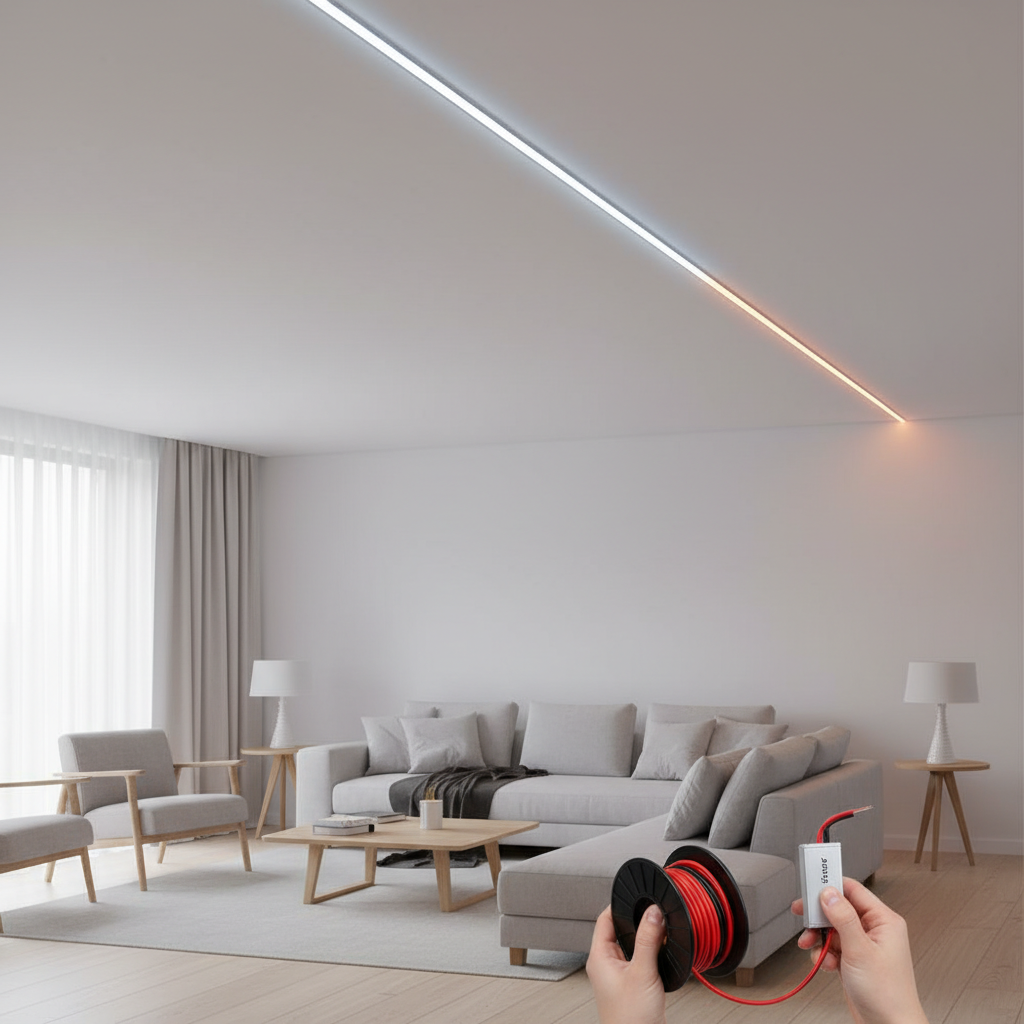
LED strip lights offer a dynamic and versatile lighting solution, transforming spaces with vibrant illumination. However, for anyone venturing beyond short, simple installations, a common challenge emerges: voltage drop. Imagine planning a stunning, continuous line of light only to find the far end noticeably dimmer or discolored compared to the beginning. This isn’t a faulty product; it’s a fundamental electrical principle at play. Understanding voltage drop and implementing effective strategies to counteract it is crucial for achieving consistent brightness and a professional finish in any extended LED strip light project.
Understanding LED Strip Voltage Drop: The Unseen Challenge
Voltage drop is the gradual reduction in electrical voltage as current flows through a conductor, such as an LED strip or its power wires, due to inherent electrical resistance. Think of it like water pressure in a long hose: the further the water travels, the lower the pressure at the end. For LED strips, this means the individual LEDs at the start of a long run receive full voltage, while those further down the line receive progressively less.
Several factors contribute to this phenomenon. The primary culprits include the length of the LED strip, the thickness (gauge) of the copper traces on the strip’s PCB and the connecting wires, and the operating voltage of the strip itself. Longer strips naturally increase resistance, and thinner copper traces or wires offer more resistance, exacerbating the drop. High-density LED strips, which draw more current per foot, are also more susceptible because increased current amplifies the voltage drop effect.
The consequences of voltage drop extend beyond mere aesthetics. You’ll typically observe:
- Uneven Brightness: The most obvious sign, where LEDs near the power source are brighter than those at the strip’s end.
- Color Shifts: Particularly noticeable in white or RGB/RGBW strips, where inadequate voltage can cause white light to appear yellowish or colored lights to look muddy and inconsistent.
- Flickering or Instability: Fluctuating voltage can lead to unstable light output.
- Increased Operating Temperature: Resistance generates heat, potentially reducing the lifespan of your LED chips.
- Reduced LED Lifespan: LEDs operating outside their optimal voltage range may degrade faster.
General guidelines suggest that 12V LED strips may show noticeable voltage drop beyond approximately 5 meters (16 feet), while 24V strips can typically run up to 10 meters (32 feet) before intervention is needed. Exceeding these lengths without proper mitigation will almost certainly lead to visible performance issues.
Essential Strategies to Combat Voltage Drop
Fortunately, several proven methods can help you extend your LED strips while maintaining uniform brightness and color consistency. Employing one or a combination of these strategies is key to a successful, long-lasting installation.
1. Opt for Higher Voltage LED Strips
One of the most effective ways to minimize voltage drop is to choose LED strips designed to operate at higher voltages, such as 24V or even 48V, instead of the more common 12V. Here’s why: for a given power output, higher voltage means lower current. Since voltage drop is directly proportional to current and resistance (Ohm’s Law: V=IR), reducing the current significantly reduces the voltage drop over the same length of wire or strip.
- 12V Strips: While safe and easy to work with for short runs (typically up to 5 meters), they experience greater line losses due to higher current draw.
- 24V Strips: By halving the current compared to a 12V strip of similar wattage, 24V strips can run twice as long (up to 10 meters or more) before exhibiting noticeable voltage drop. They offer a good balance of safety and efficiency for most commercial and residential applications.
- 48V Strips: Ideal for ultra-long distance applications (30 meters or more), 48V systems draw significantly less current (one-fourth of 12V strips at equivalent power), leading to minimal voltage drop and greater energy efficiency. However, they may require specialized power supplies and adherence to higher voltage safety standards.
|
Our Picks for the Best LED strip light in 2026
As an Amazon Associate I earn from qualifying purchases.
|
||
| Num | Product | Action |
|---|---|---|
| 1 | KSIPZE 100ft Led Strip Lights RGB Music Sync Color Changing Led Lights with Smart App Control Remote Led Lights for Bedroom Room Lighting Flexible Home Décor |

|
| 2 | Govee White LED Strip Lights, Upgraded 16.4ft Dimmable LED Light Strip 6500K Bright Daylight White, Strong Adhesive, 300 LEDs Flexible Tape Lights for Mirror, Kitchen Cabinet, Bedroom, Christmas Decor |
|
| 3 | dalattin White LED Strip Lights, 20ft Dimmable Super Bright 24V Led Tape Light 6500K 360 LEDs Lights for Bedrooms, Mirror, Kitchen, Home Decoration Daylight White |
|
| 4 | Barrina (6 Pack LED T5 Integrated Single Fixture, 4FT, 2200lm, 6500K Super Bright White, 20W Utility LED Shop Light, Ceiling and Under Cabinet Light, Corded Electric with ON/Off Switch, ETL Listed |
|
| 5 | DAYBETTER Led Strip Lights 32.8ft Kit with Remote and Power Supply Color Changing |
|
| 6 | NBBUFF Led Lights for Bedroom 50ft (1 Roll), Color Changing RGB Led Strip Lights with 60 Keys Remote and App Control, Music Sync Led Lights for Room Kitchen Party Home Decor |
|
| 7 | Govee 100ft RGBIC LED Strip Lights, Smart LED Lights Work with Alexa and Google Assistant, LED Lights for Bedroom WiFi App Control Segmented DIY Multiple Colors, Color Changing Light, (2 x 50ft) |
|
| 8 | Govee RGBIC LED Strip Lights, Smart LED Lights for Bedroom, Bluetooth LED Lights APP Control, DIY Multiple Colors on One Line, Color Changing LED Strip Lighting Music Sync, Home Decor, 16.4ft |
|
| 9 | DAYBETTER LED Strip Lights 110ft, Smart Lighting Strips with App Remote Control, RGB Music Sync Color Changing Lights for Bedroom Kitchen Party Home Decor Luces led para cuarto (1 Roll) |
|
| 10 | White Led Strip Lights for Bedroom Small Dimmable LED Lights Strip 16.4ft Super Bright Flexible LED Tape Lights Rope Light for for Room Home Decor Luces Leds for Living Room Kitchen Vanity Mirror |
|
2. Power Injection: The Key to Consistent Brightness
Power injection is a widely used technique that involves connecting additional power wires from your power supply to strategic points along your LED strip. This method ensures that all sections of the strip receive adequate voltage, preventing dimming and color shifts. There are three primary ways to implement power injection:
- Dual-End Powering (Powering Both Ends): For a single, extended run of an LED strip, you can connect the power supply to both the beginning and the end of the strip. This effectively shortens the electrical path for current, balancing the voltage distribution across the entire length. It’s a simple and effective method for medium-length strips.
- Mid-Point Powering: If powering both ends isn’t feasible or for a very long strip, you can strategically place the power supply in the middle of your desired run. The strip is then split into two shorter sections, running in opposite directions from the central power source. This significantly reduces the maximum distance current has to travel to any point on the strip. Alternatively, you can run a thicker gauge wire from the power supply to the midpoint of an uncut strip.
- Parallel Powering (Segmented Control): For very long or complex installations, the most robust solution is to divide your total LED strip length into multiple shorter segments. Each segment is then connected directly and independently to the main power supply (or a power distribution block). This ensures each section receives full, consistent voltage, eliminating voltage drop across the entire installation.
When planning power injection, a general rule for 12V strips is to inject power every 5 meters, and for 24V strips, every 10 meters. For even longer runs or high-density strips, these intervals may need to be shortened.
3. Choose the Right Wire Gauge
The wires connecting your LED strip to the power supply, or for power injection, play a crucial role in preventing voltage drop. Thicker wires have less electrical resistance than thinner wires. Using an appropriately thick wire (indicated by a lower American Wire Gauge, or AWG, number) ensures that minimal voltage is lost in the wiring before it even reaches your LED strip.
To determine the correct wire gauge, you’ll need to consider:
- Total Current (Amps): Calculate the total wattage of your LED strip(s) and divide by the operating voltage (e.g., Watts / 12V = Amps).
- Length of the Wire Run: The distance from your power supply to the furthest point of your LED strip or power injection point.
A common mistake is using thin, pre-attached wires over long distances, leading to significant voltage drop. Always consult a wire gauge chart to select the appropriate thickness for your specific current and distance requirements, and consider adding a safety margin by choosing the next thicker wire.
4. Utilize Constant Current (CC) LED Strips
Traditional LED strips are “constant voltage” (CV) strips, meaning they expect a consistent input voltage (e.g., 12V or 24V). When voltage drops, their brightness decreases. Constant current (CC) LED strips, however, incorporate integrated circuit (IC) chips that regulate the current flowing through each LED segment.
This innovative design ensures that even if there’s a slight voltage drop along the strip, the ICs adjust to maintain a stable current, resulting in consistent brightness and color output across much longer runs (e.g., 20m to 30m for 24V or 48V versions) without the need for frequent power injection. While generally more expensive, CC strips offer superior uniformity and simplified wiring for extended installations where consistent light quality is paramount.
Step-by-Step Guide to Extending LED Strips with Power Injection
Implementing power injection might seem daunting, but it’s a straightforward process with careful planning.
- Plan Your Layout and Power Points: Sketch your installation. Identify the total length of your LED strip run and mark where voltage drop is likely to occur (typically beyond 5m for 12V, 10m for 24V). These are your potential power injection points.
- Calculate Power Requirements: Determine the wattage per meter of your LED strip and multiply it by the total length to get the total wattage. Add a 20-30% buffer to this figure to select an appropriately sized power supply. This headroom prevents the power supply from operating at its maximum capacity, which can lead to voltage sag and reduced lifespan.
- Choose Connectors:
- Soldering: For the most secure and reliable connection with minimal resistance, soldering wires directly to the copper pads on the LED strip is recommended.
- Solderless Connectors: While convenient, ensure you use high-quality, reputable connectors that provide a firm grip on the strip’s copper pads. Poor connections can introduce additional resistance and negate the benefits of power injection.
- Prepare Wires: Cut additional power wires (typically 2-conductor for single-color, 3-conductor for CCT, 4-conductor for RGB, 5-conductor for RGBW) to the lengths needed to reach your injection points from the power supply. Strip a small amount of insulation from the ends of each wire.
- Connect Wires: Carefully connect the additional wires to the corresponding positive (+) and negative (-) pads on your LED strip at the designated injection points. Crucially, maintain correct polarity: positive from the power supply connects to the positive pad on the strip, and negative to negative. If using RGB/RGBW strips, ensure all color channels are also correctly connected if you’re splitting the strip.
- Connect to Power Supply: Route the other ends of these injection wires back to your main power supply or a power distribution terminal, ensuring correct polarity.
- Test the Setup: Before final installation, power on your LED strips and inspect the entire length for consistent brightness and color. If any sections still appear dim or discolored, recheck your connections and wire gauge.
Comparative Table of LED Strip Powering Methods
| Method | Description | Pros | Cons | Ideal Use Case |
|---|---|---|---|---|
| Single-End Power | Power supplied only from one end of the strip. | Simplest wiring, least connections. | Severe voltage drop, dimming/color shift on longer runs. | Very short runs (e.g., under 5m for 12V, 10m for 24V). |
| Dual-End Power | Power supplied to both the beginning and end of a single strip. | Improves brightness consistency, relatively simple. | More wiring than single-end, may still have minor drop in middle of very long runs. | Medium runs where a continuous strip is desired. |
| Mid-Point Power | Power supplied to the center of a strip (often cut into two sections). | Balances voltage distribution, effective for longer continuous runs. | Requires cutting the strip and careful wiring to the center. | Longer continuous runs where power can be centrally located. |
| Parallel Powering | Dividing a long run into multiple shorter segments, each powered independently. | Best consistency, eliminates voltage drop across segments, very long runs possible. | Most complex wiring, requires multiple connections back to power supply. | Very long, critical, or complex installations demanding high uniformity. |
| Higher Voltage Strips | Using 24V or 48V LED strips. | Inherently better for longer runs, reduced current, less wiring for power injection. | May require specific drivers and controllers, potentially higher initial cost. | All runs, especially longer ones where simplified wiring is preferred. |
| Constant Current Strips | LED strips with integrated ICs that regulate current. | Excellent consistency over very long lengths, minimal power injection needed. | Higher cost, potentially less common, may require specific drivers. | Long runs where perfect uniformity is critical (e.g., architectural lighting). |
Troubleshooting Common Issues
Even with careful planning, issues can arise. Here’s how to address them:
- Uneven Brightness: This is the hallmark of voltage drop. Re-evaluate your power injection points, consider adding more, or switch to a higher voltage or constant current strip. Check your wire gauge to ensure it’s sufficient for the length and current.
- Flickering: Often indicates insufficient or inconsistent power delivery. Check all connections for looseness, ensure your power supply has enough wattage headroom, and verify proper wire gauge.
- Color Inconsistencies: Primarily affects RGB/RGBW strips. This is usually due to voltage drop affecting different color channels unevenly. Power injection is the primary solution. For very long RGB/RGBW runs, consider using signal amplifiers or repeaters to maintain consistent data signals in addition to power.
Conclusion
Extending LED strip lights without encountering frustrating voltage drop is entirely achievable with the right knowledge and techniques. By understanding the causes of voltage drop and strategically implementing solutions such as choosing higher-voltage strips, utilizing power injection methods (dual-end, midpoint, or parallel powering), selecting appropriate wire gauges, or investing in constant current LED strips, you can ensure your lighting projects shine with uniform brilliance from end to end. Thoughtful planning and attention to detail during installation will not only enhance the aesthetic appeal of your lighting but also contribute to the longevity and stable performance of your LED system.
What innovative lighting project are you planning that demands perfect, uninterrupted illumination?
Câu Hỏi Thường Gặp
What is the maximum length I can extend an LED strip?
The maximum length depends on the strip’s voltage and quality, but generally, 12V constant voltage strips are limited to about 5 meters (16 feet) and 24V strips to 10 meters (32 feet) before visible voltage drop occurs. With proper power injection and appropriate wire gauge, these lengths can be significantly extended, especially with constant current or 48V strips.
Can I use a power booster/amplifier?
Power boosters or amplifiers are specifically used with RGB/RGBW LED strips to regenerate and extend the data signal for color control over long distances. While they help maintain color consistency, they do not directly address voltage drop. You still need to manage power delivery through methods like power injection for the actual voltage supply.
How do I calculate the correct wire gauge?
To calculate the correct wire gauge, you need the total wattage of your LED strip(s) and the operating voltage to find the total current (Amps = Watts / Volts). Then, consider the distance the wire needs to run. Use an online voltage drop calculator or a wire gauge chart, adding a 20-30% safety margin, to determine the appropriate (lower AWG) wire size to minimize voltage loss.
What are constant current LED strips?
Constant current (CC) LED strips feature built-in integrated circuits that regulate the current flowing through each LED segment. This ensures consistent brightness and color output along the entire length of the strip, even if there’s a slight drop in voltage. They are an advanced solution for long runs, minimizing the need for extensive power injection.