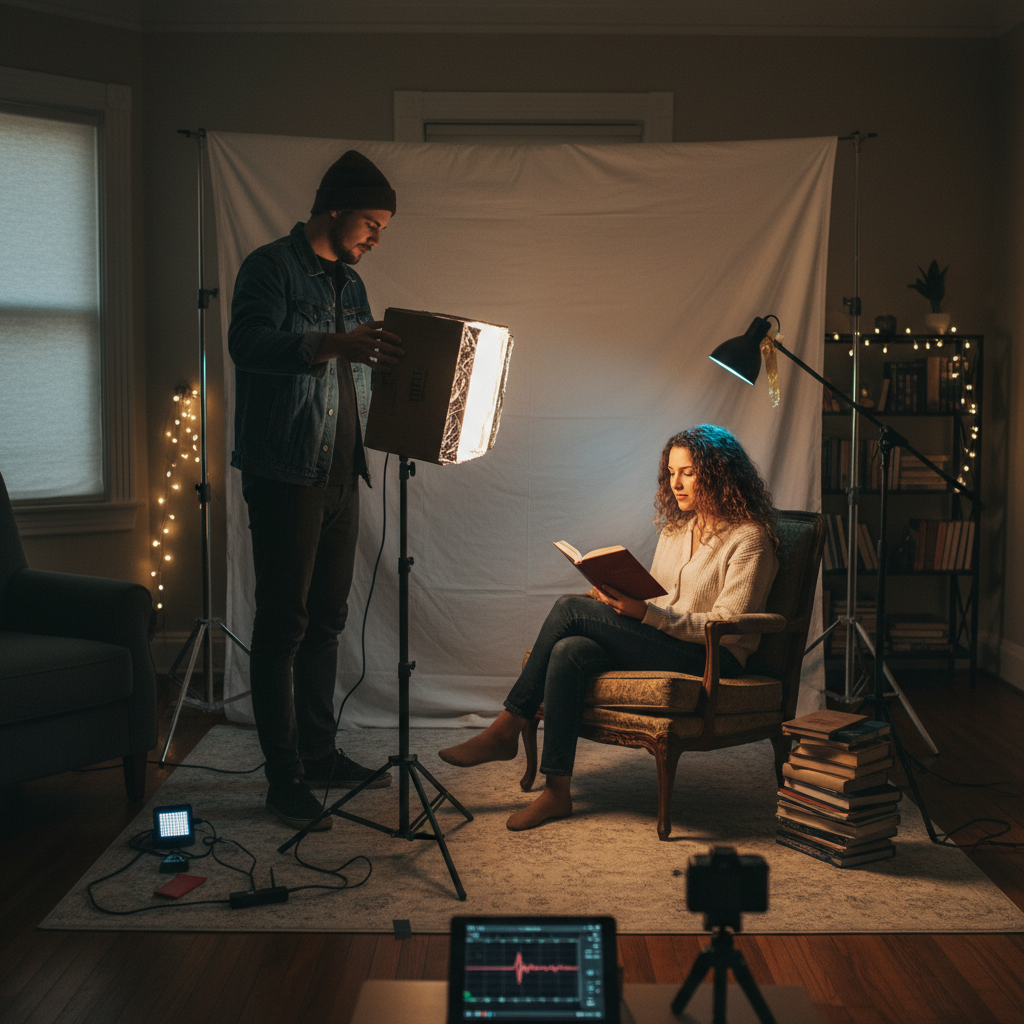
Ever wondered how professional films achieve that captivating visual depth and mood? While Hollywood budgets boast expensive gear, you can replicate many cinematic lighting techniques right in your own home using DIY methods and affordable tools. Transforming ordinary spaces into compelling scenes is not about the most expensive equipment, but rather understanding light and shadow. This guide will walk you through the fundamentals and practical steps to create stunning, cinematic lighting on a budget, turning your home into a versatile film studio.
Understanding Cinematic Lighting Fundamentals
Cinematic lighting isn’t just about making things visible; it’s about storytelling, evoking emotion, and adding depth to your visuals. The difference between a bland home video and a compelling scene often lies in how light is shaped and controlled.
At its core, cinematic lighting manipulates light and shadow to create mood, separate subjects from backgrounds, and guide the viewer’s eye. Key principles include controlling the quality of light (hard or soft), its direction, and its intensity. Soft light, characterized by gradual transitions between light and shadow, is generally preferred for a more flattering and natural look, mimicking large natural light sources like an overcast sky. Hard light, with sharp, well-defined shadows, can create drama and intensity. Effective cinematic lighting is also often motivated, meaning the light sources within your scene (like a window or a lamp) appear to be the natural origin of the illumination.
A foundational concept in lighting is the Three-Point Lighting Setup, consisting of:
- Key Light: The main light source, typically the brightest, that illuminates your subject.
- Fill Light: A softer light used to reduce shadows created by the key light, providing balance without eliminating depth.
- Backlight (or Hairlight): Placed behind the subject, it separates them from the background, adding dimension and a subtle glow.
Essential DIY Tools for Cinematic Lighting
You don’t need a professional studio full of gear to get started. Many common household items can be repurposed into effective lighting tools.
1. Natural Light: Your Free Powerhouse
The sun is the most powerful and accessible light source.
- Windows: Use large windows as a primary key light, especially during the day. Position your subject facing or angled towards the window for soft, natural illumination.
- Golden Hour: The period just after sunrise or before sunset offers a warm, soft, and naturally cinematic light, perfect for evocative scenes. Position the sun behind your subject for a beautiful rim light.
2. Household Items for Light Shaping
- Diffusers: Materials that soften hard light.
- Shower Curtains or White Bed Sheets: Drape these over windows or in front of a light source to create a larger, softer light.
- Wax Paper or Parchment Paper: Can be taped over smaller light sources, like desk lamps, for a diffused effect.
- Tissue Paper: Excellent for subtly softening small practical lights.
- Reflectors/Bounces: Materials that redirect and fill in light.
- White Foam Boards or Cardboard: Bounce light back onto your subject to reduce harsh shadows.
- White Blankets or Sheets: Can serve as large, soft reflectors.
- Aluminum Foil (crinkled then smoothed): Creates a harder, more specular bounce, useful for adding sparkle.
- Negative Fill: Materials that absorb light, deepening shadows and increasing contrast.
- Black Cards or Foam Boards: Place opposite your key light to prevent light from bouncing back, enhancing shadows.
- Black Tablecloths or Fabric: Can be used to block unwanted light or create a darker background.
- Practical Lights: Existing lamps, candles, and smart LED lights within your home. These are crucial for motivated lighting.
3. Budget-Friendly Gear Additions
While the focus is DIY, a few affordable purchases can significantly enhance your setup.
- Affordable LED Panels or Tube Lights: Brands like Ulanzi or budget COB lights (e.g., Smallrig RC 120B) offer controllable light sources for under $100-$200.
- Clamps and Gaffer Tape: Essential for securing diffusers, reflectors, and lights.
- Gels (CTO/CTB): Color Temperature Orange (CTO) and Color Temperature Blue (CTB) gels can alter the color of your lights to match natural light or create specific moods.
- DIY Light Stands: Tripods, broom handles, or even stacks of books can elevate your lights.
Step-by-Step Cinematic Lighting Setups
Let’s explore practical setups you can implement today.
Setup 1: Natural Window Light Masterclass
|
Our Picks for the Best LED strip light in 2026
As an Amazon Associate I earn from qualifying purchases.
|
||
| Num | Product | Action |
|---|---|---|
| 1 | DAYBETTER Led Strip Lights 32.8ft Kit with Remote and Power Supply Color Changing |

|
| 2 | Barrina (6 Pack LED T5 Integrated Single Fixture, 4FT, 2200lm, 6500K Super Bright White, 20W Utility LED Shop Light, Ceiling and Under Cabinet Light, Corded Electric with ON/Off Switch, ETL Listed |
|
| 3 | DAYBETTER LED Strip Lights 110ft, Smart Lighting Strips with App Remote Control, RGB Music Sync Color Changing Lights for Bedroom Kitchen Party Home Decor Luces led para cuarto (1 Roll) |
|
| 4 | Govee White LED Strip Lights, Upgraded 16.4ft Dimmable LED Light Strip 6500K Bright Daylight White, Strong Adhesive, 300 LEDs Flexible Tape Lights for Mirror, Kitchen Cabinet, Bedroom, Christmas Decor |
|
| 5 | dalattin White LED Strip Lights, 20ft Dimmable Super Bright 24V Led Tape Light 6500K 360 LEDs Lights for Bedrooms, Mirror, Kitchen, Home Decoration Daylight White |
|
| 6 | NBBUFF Led Lights for Bedroom 50ft (1 Roll), Color Changing RGB Led Strip Lights with 60 Keys Remote and App Control, Music Sync Led Lights for Room Kitchen Party Home Decor |
|
| 7 | Govee RGBIC LED Strip Lights, Smart LED Lights for Bedroom, Bluetooth LED Lights APP Control, DIY Multiple Colors on One Line, Color Changing LED Strip Lighting Music Sync, Home Decor, 16.4ft |
|
| 8 | White Led Strip Lights for Bedroom Small Dimmable LED Lights Strip 16.4ft Super Bright Flexible LED Tape Lights Rope Light for for Room Home Decor Luces Leds for Living Room Kitchen Vanity Mirror |
|
| 9 | Govee 100ft RGBIC LED Strip Lights, Smart LED Lights Work with Alexa and Google Assistant, LED Lights for Bedroom WiFi App Control Segmented DIY Multiple Colors, Color Changing Light, (2 x 50ft) |
|
| 10 | KSIPZE 100ft Led Strip Lights RGB Music Sync Color Changing Led Lights with Smart App Control Remote Led Lights for Bedroom Room Lighting Flexible Home Décor |
|
Leveraging a window is one of the simplest and most effective ways to achieve cinematic lighting.
- Position Your Subject: Place your subject near a large window, ideally at a 45-degree angle. The window acts as your soft, primary key light.
- Add a Reflector (Fill Light): On the opposite side of your subject, place a white foam board or white sheet. This will bounce some window light back, softening the shadows on the subject’s face. Adjust its distance and angle to control the amount of fill.
- Introduce Negative Fill (Optional, for Drama): If you want more dramatic contrast, place a black card or fabric on the fill side, close to the subject. This absorbs stray light, deepening shadows and creating a more moody look.
Setup 2: The Versatile Single Light Setup
Even with just one artificial light source, you can create compelling scenes.
- Choose Your Light: This could be a powerful budget LED light, a household lamp with a bright bulb, or even a DIY paper lantern.
- Soften the Light: Always diffuse your light. Place a shower curtain or large white fabric in front of your light source to enlarge it and soften its output. A “book light” setup involves bouncing your light off a reflector (e.g., white foam board) and then passing that bounced light through a diffusion material (like a shower curtain). This creates incredibly soft, even illumination.
- Position for Effect:
- Rembrandt Lighting: Place your diffused key light slightly above and to the side of your subject (around a 45-degree angle). Aim to create a small triangle of light on the shadowed side of their face, just under the eye.
- Loop Lighting: Similar to Rembrandt, but the shadow from the nose creates a small “loop” and doesn’t connect with the cheek’s shadow.
- Dramatic Low-Key: Use a single, hard light source (less diffusion) from the side or back, allowing large areas of shadow to dominate. Use negative fill to enhance this.
- Add Background Separation (Optional): If your single light is also serving as your key, consider placing a subtle practical light (like a table lamp or a string of LEDs) in the background to provide some separation.
Setup 3: Crafting Mood with Practical Lights
Practical lights are visible light sources within your scene. They are key to motivated lighting and adding realism.
- Enhance Existing Practicals: If you have a desk lamp or floor lamp, turn it on. If it’s too bright or harsh, diffuse it with tissue paper or wax paper.
- Add Supplemental Lighting: Use an additional, hidden light source (like a small LED panel or a DIY paper lantern) to amplify the effect of the practical. For example, if a table lamp is your motivated source, position your hidden key light to mimic its direction and intensity, making the practical appear brighter than it actually is.
- Colored Gels for Atmosphere: Place colored gels over hidden lights or practicals to create specific moods. Orange gels can simulate firelight or a warm sunset, while blue gels can evoke moonlight or a cool, nighttime ambiance. For instance, to create a moody candlelit scene, turn off overhead lights, light a real candle, then use a small LED light with an orange gel off-camera to amplify the candle’s glow.
Advanced Techniques for a Polished Look
Once you’ve mastered the basics, consider these techniques to elevate your cinematic lighting.
- Adding Backlight/Hairlight: A subtle backlight, often from above and behind the subject, helps them stand out from the background, adding a sense of depth and dimension. Even a simple desk lamp positioned strategically can work.
- Controlling Light Spill: Prevent light from hitting unwanted areas by creating DIY flags or “barn doors.” Use black cardboard or aluminum foil (black side out) to shape your light beam. This helps create pockets of light and shadow, mimicking professional setups.
- Utilizing Haze/Fog (Subtly): A very light haze (from a fog machine or even household steam in a controlled environment) can catch light rays, making light sources appear more visible and creating a dreamy, atmospheric effect often seen in cinema. Use sparingly to avoid an artificial look.
- Color Temperature and White Balance: Understand how different light sources have different color temperatures (warm, cool). Adjust your camera’s white balance to achieve the desired look. For example, setting a cooler white balance can make warm practical lights appear even warmer, enhancing contrast.
Comparison of DIY Lighting Approaches
Here’s a quick overview of common DIY lighting tools and their characteristics:
| Type of DIY Light | Pros | Cons | Best Use Case | Cost Estimate |
|---|---|---|---|---|
| Natural Window Light | Free, naturally soft, realistic | Inconsistent, uncontrollable | Daytime scenes, interviews | Free |
| Household Lamps | Readily available, motivated | Limited power/control, often harsh | Accent lighting, background elements | Very Low |
| LED Strip Lights | Versatile colors, flexible, low profile | Can be harsh if not diffused, limited throw | Backlight, practicals, accent effects | Low-Medium |
| DIY Paper Lantern | Creates soft, even, wrap-around light | Fragile, requires assembly | Key or fill light, portable light source | Very Low |
| Affordable COB Light | Powerful, controllable, good color quality | Requires small initial investment | Main key/fill light, creating dramatic looks | Medium-High |
Common Mistakes to Avoid in Home Cinematic Lighting
Even with the best intentions, it’s easy to fall into common pitfalls that can detract from your cinematic vision.
- Over-lighting: Don’t just blast your scene with light. Too much light can make a scene look flat and artificial. Embrace shadows to create mood and depth.
- Flat Lighting: Avoid placing your primary light source directly in front of your subject, as this flattens features and removes dimensionality. Angle your lights to create shape and shadow.
- Unmotivated Light: If there’s no visible or implied light source in your scene (like a window, lamp, or even a moonlight glow), your artificial lighting can feel out of place. Always try to “motivate” your light.
- Ignoring the Background: The background is just as important as the foreground. A well-lit background adds context and depth, preventing your subject from floating in a “void.” Use practicals or subtle accent lights to create interest.
Conclusion
Creating cinematic lighting at home is an exciting journey that requires creativity, observation, and a willingness to experiment. By understanding fundamental principles like soft versus hard light, three-point setups, and the importance of motivated lighting, you can transform everyday household items into powerful tools. Remember, the goal is not to perfectly replicate expensive film sets, but to cultivate an eye for how light influences mood and storytelling. Start with natural light, experiment with diffusion and bounce, and gradually build your DIY toolkit.
What cinematic mood will you create first in your home studio?