Transforming your space with vibrant, dynamic LED strip lights is an incredibly rewarding DIY project. As the Admin of reviewrinv.com and a technician with over a decade of experience in LED technology, I’ve seen countless installations, from simple accent lighting to complex, multi-zone setups. While LED strips offer unparalleled flexibility, achieving a professional and safe installation often requires cutting and connecting them to fit your specific design needs. This comprehensive guide will walk you through every step, ensuring you can customize your LED strip lights safely and effectively, creating the perfect ambiance for any environment.
Understanding Your LED Strip Lights: The Basics
LED strip lights, also known as LED tape or ribbon lights, are flexible circuit boards embedded with light-emitting diodes (LEDs) and typically come with an adhesive backing for easy installation. They are beloved for their energy efficiency, versatility, and ability to produce a wide spectrum of colors and effects. Understanding their basic construction is crucial before attempting any modifications. Most strips operate on low-voltage DC power (e.g., 12V or 24V), making them relatively safe to handle.
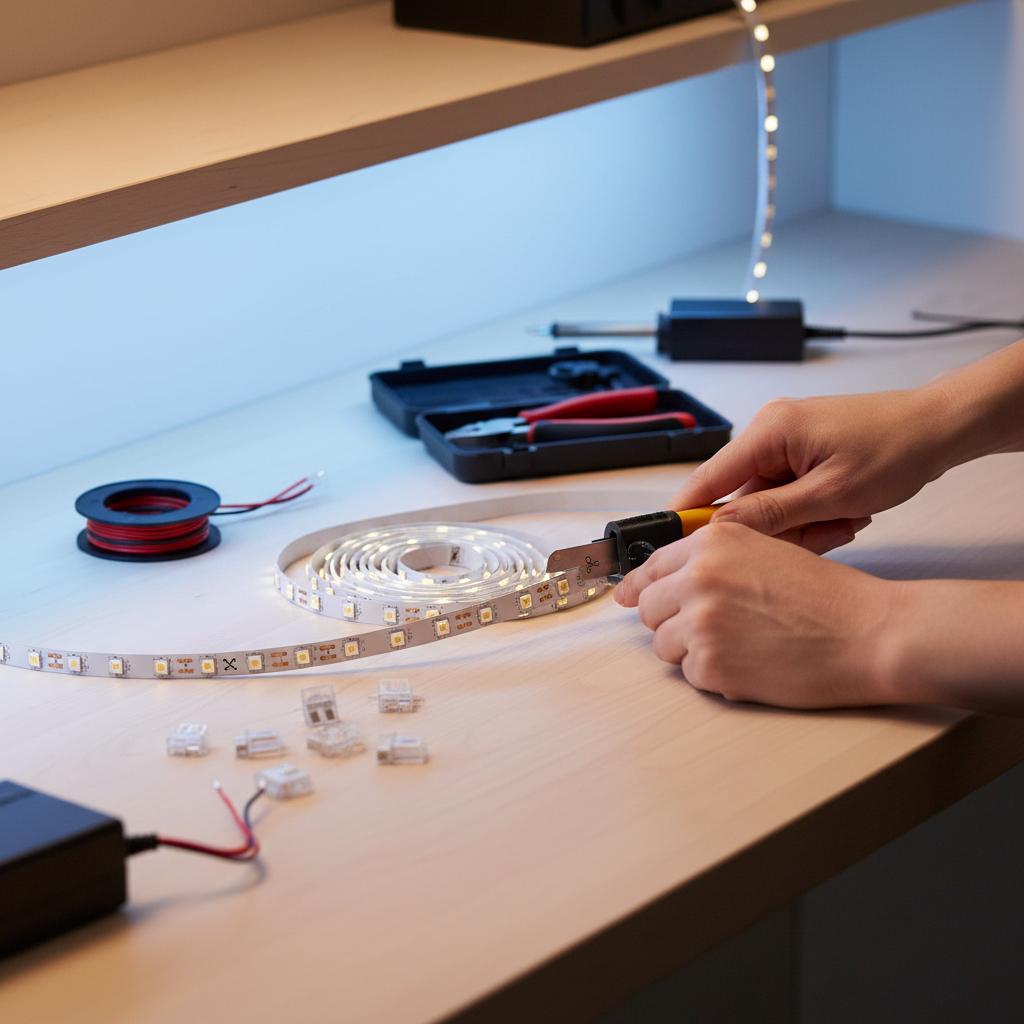
A key feature of these strips is their designated cutting marks, usually indicated by a small scissor symbol or a copper line across the strip. These marks signify safe cutting points where the circuit is designed to be interrupted without damaging the LEDs or overall functionality. These points also expose copper pads, which are essential for re-establishing electrical connections when joining multiple sections. The ability to cut and connect these strips allows for precise customization, whether you’re illuminating cabinets, outlining architectural features, or creating unique lighting art.
Essential Tools for Cutting and Connecting LED Strips
Having the right tools is paramount for a clean, safe, and successful LED strip light project. Before you begin, gather these essentials to ensure a smooth workflow:
- LED Strip Lights: The star of your project, ensure you have enough length for your design.
- Sharp Scissors or a Utility Knife: For making precise, clean cuts on the strip. A sharp blade is vital to avoid fraying or damaging the delicate circuitry.
- Ruler or Measuring Tape: For accurately determining the desired length and marking your cut points.
- LED Strip Light Connectors (Solderless): These snap-on connectors offer a quick and easy way to join cut sections without soldering. They come in various configurations (e.g., 2-pin for single color, 4-pin for RGB).
- Soldering Iron and Solder (Optional, for permanent connections): If you prefer a more robust and permanent connection, or if working in a tighter space, soldering is an excellent alternative.
- Wire Strippers (Optional): Necessary if you’re soldering to wires.
- Heat Shrink Tubing or Electrical Tape (Optional): Essential for insulating soldered connections, preventing short circuits and providing protection.
- Pencil or Marker: For clearly marking your cutting and connection points.
Step-by-Step Guide to Safely Cutting LED Strip Lights
Cutting LED strip lights is a straightforward process, but precision and safety are key. Follow these steps meticulously to ensure your strip remains functional and safe.
Safety First: Power Down
|
Our Picks for the Best LED strip light in 2026
As an Amazon Associate I earn from qualifying purchases.
|
||
| Num | Product | Action |
|---|---|---|
| 1 | Barrina (6 Pack LED T5 Integrated Single Fixture, 4FT, 2200lm, 6500K Super Bright White, 20W Utility LED Shop Light, Ceiling and Under Cabinet Light, Corded Electric with ON/Off Switch, ETL Listed |

|
| 2 | Govee White LED Strip Lights, Upgraded 16.4ft Dimmable LED Light Strip 6500K Bright Daylight White, Strong Adhesive, 300 LEDs Flexible Tape Lights for Mirror, Kitchen Cabinet, Bedroom, Christmas Decor |
|
| 3 | Govee 100ft RGBIC LED Strip Lights, Smart LED Lights Work with Alexa and Google Assistant, LED Lights for Bedroom WiFi App Control Segmented DIY Multiple Colors, Color Changing Light, (2 x 50ft) |
|
| 4 | White Led Strip Lights for Bedroom Small Dimmable LED Lights Strip 16.4ft Super Bright Flexible LED Tape Lights Rope Light for for Room Home Decor Luces Leds for Living Room Kitchen Vanity Mirror |
|
| 5 | NBBUFF Led Lights for Bedroom 50ft (1 Roll), Color Changing RGB Led Strip Lights with 60 Keys Remote and App Control, Music Sync Led Lights for Room Kitchen Party Home Decor |
|
| 6 | KSIPZE 100ft Led Strip Lights RGB Music Sync Color Changing Led Lights with Smart App Control Remote Led Lights for Bedroom Room Lighting Flexible Home Décor |
|
| 7 | DAYBETTER Led Strip Lights 32.8ft Kit with Remote and Power Supply Color Changing |
|
| 8 | Govee RGBIC LED Strip Lights, Smart LED Lights for Bedroom, Bluetooth LED Lights APP Control, DIY Multiple Colors on One Line, Color Changing LED Strip Lighting Music Sync, Home Decor, 16.4ft |
|
| 9 | dalattin White LED Strip Lights, 20ft Dimmable Super Bright 24V Led Tape Light 6500K 360 LEDs Lights for Bedrooms, Mirror, Kitchen, Home Decoration Daylight White |
|
| 10 | DAYBETTER LED Strip Lights 110ft, Smart Lighting Strips with App Remote Control, RGB Music Sync Color Changing Lights for Bedroom Kitchen Party Home Decor Luces led para cuarto (1 Roll) |
|
Before you touch your LED strip with any tool, always disconnect it from its power source. This critical step prevents electric shock and safeguards against accidental short circuits that could damage the strip or your power supply. Working with live electricity is dangerous and should be avoided at all costs during installation.
Locate the Cutting Marks
Carefully examine your LED strip light. You will find small, regularly spaced lines or scissor symbols along its length. These are the designated cutting points. It’s imperative to only cut at these specific marks. Cutting elsewhere will sever the internal circuit paths, rendering that section of the strip inoperable. These marks typically expose copper pads on either side, which are designed for reconnection.
Measure and Mark Precisely
Using your ruler or measuring tape, determine the exact length of LED strip light you need. Once you have your measurement, align it with the nearest designated cutting mark. Use a pencil or marker to clearly mark this point on the strip. Double-checking your measurement now can save you from costly mistakes later.
Make the Clean Cut
With your sharp scissors or utility knife, make a single, firm cut directly along the marked line. Apply gentle, even pressure to ensure a clean, straight edge. Avoid jagged cuts, which can make connecting difficult. If using scissors, ensure they are sharp enough to cut through the flexible PCB cleanly. For a utility knife, use a cutting mat underneath to protect your work surface.
Inspect the Cut
After cutting, examine both ends of the severed strip. You should see exposed copper pads on each end. These pads are crucial for establishing an electrical connection when you join sections. Ensure they are clean, intact, and free from any frayed material or residue that could hinder conductivity. If the pads are damaged, you may need to trim back to the next designated cutting mark.
Connecting LED Strip Lights: Two Reliable Methods
Once you’ve cut your LED strip to the desired length, the next step is to connect it, whether to another strip, a power supply, or a controller. There are two primary methods for this: using solderless connectors or soldering.
Method 1: Using Solderless Connectors (The Easy Way)
Solderless connectors are the most popular and easiest method for joining LED strip sections, ideal for DIY enthusiasts.
- Choose the Right Connector: Select connectors that match your LED strip type. This means matching the number of pins (e.g., 2-pin for single color, 4-pin for RGB, 5-pin for RGBW) and the width of your strip.
- Prepare the Strip Ends: Ensure the copper pads on both ends of the LED strips you wish to connect are clean and dry. Gently lift the locking clip on the connector.
- Insert the Strip: Carefully slide one end of the LED strip into the connector, ensuring the copper pads on the strip align precisely with the metal pins inside the connector. Some connectors require the strip to slide under the pins. Double-check that the polarity (positive to positive, negative to negative, or specific color channels) is correct, especially for RGB strips.
- Secure the Connection: Once aligned, firmly press down the locking clip to secure the strip in place. Give it a gentle tug to ensure it’s firmly seated. Repeat the process for the other strip if connecting two sections.
- Test: Plug in your power supply and test the connection. If the lights don’t work, unplug immediately and re-check alignment and polarity.
This method is quick, requires no special skills, and is easily reversible. However, connectors can sometimes be bulky and are generally less resistant to moisture or physical stress than soldered joints.
Method 2: Soldering for a Permanent Connection (The Pro Way)
Soldering provides a highly durable, low-profile, and permanent electrical connection, often preferred for professional installations or outdoor applications. This method requires a bit more skill and specialized tools.
- Prepare Wires and Strip: If connecting two strips, you’ll first need to solder short wires (typically 2, 4, or 5 conductor wires) to the copper pads on one strip. Strip a small amount of insulation (about 1/8 inch) from each wire.
- Tin the Pads and Wires: “Tinning” involves applying a thin layer of solder to the copper pads on the LED strip and the exposed tips of your wires. Heat the pad with the soldering iron, then briefly touch the solder to the pad until a small bead forms. Do the same for the wire tips. This helps create a strong bond.
- Solder the Connections: Carefully align the tinned wire tips with the corresponding tinned copper pads on the LED strip (e.g., positive wire to positive pad, red wire to red pad, etc.). Heat both the wire and the pad simultaneously with the soldering iron, allowing the solder to flow and create a solid joint. Ensure each connection is clean and separate, avoiding bridges between pads.
- Insulate the Joints: Once the solder has cooled, cover the exposed soldered joints with heat shrink tubing or electrical tape. Heat shrink tubing provides a cleaner, more robust insulation; simply slide a piece over the joint and apply heat until it shrinks snugly around the connection. This step is crucial for preventing short circuits and protecting the connections from environmental factors.
- Test: Before final installation, connect your power supply and test the strip. If any section fails, disconnect power and inspect your solder joints for cold solder points or bridges.
Soldering offers a superior electrical connection and a much cleaner aesthetic, especially when routing wires, but it does demand a steady hand and practice.
Important Safety Precautions and Best Practices
Safety is paramount when working with electrical components. Adhering to these best practices will ensure a safe and long-lasting LED strip light installation.
- Always Disconnect Power: This cannot be stressed enough. Never cut, connect, or handle LED strips while they are connected to a power source.
- Use the Correct Power Supply: Ensure your power supply’s voltage (e.g., 12V or 24V) matches your LED strip’s requirements, and that its wattage is sufficient for the total length of your strip. An undersized power supply can lead to dimming, flickering, or premature failure.
- Insulate All Exposed Connections: Whether using electrical tape, heat shrink tubing, or specialized connector covers, always ensure that all exposed wires or solder joints are properly insulated. This prevents short circuits and protects against accidental contact.
- Avoid Cutting Outside Designated Marks: Straying from the marked cutting points will damage the strip’s circuitry and render sections unusable.
- Handle with Care: LED strips, especially the flexible circuit board, are delicate. Avoid sharp bends, excessive pulling, or crushing, which can damage the internal components.
- Test Connections Thoroughly: Before mounting or making permanent installations, always test your cut and connected strips with the power supply. This allows you to identify and rectify any issues proactively.
- Consider IP Ratings for Environments: If installing in areas exposed to moisture (bathrooms, outdoors), ensure your LED strips and connectors have an appropriate Ingress Protection (IP) rating (e.g., IP65 or higher for splash resistance).
“Many DIYers underestimate the importance of proper insulation, especially with soldered connections. A well-insulated joint not only prevents short circuits but also significantly extends the lifespan of your LED installation by protecting it from dust and moisture.” – Lena Nguyen, Senior LED Lighting Engineer
Troubleshooting Common Issues
Even with careful planning, issues can sometimes arise. Here are quick solutions for common problems:
- Lights Not Turning On:
- Check if the power supply is plugged in and working.
- Verify all connections are secure and properly seated (especially with solderless connectors).
- Ensure correct polarity (+ to +, – to -).
- Inspect solder joints for any loose connections or cold solder spots.
- Check for damage to the strip itself, particularly at the cut points.
- Only Part of the Strip is Lit:
- This usually indicates a break in the circuit or a faulty connection at the point where the lights stop. Re-examine the last working segment and the first non-working segment.
- Re-seat connectors or inspect solder joints in that area.
- Flickering or Dimming:
- The power supply might be insufficient for the length of the strip.
- Loose connections or voltage drop over very long runs can cause this. Consider injecting power at multiple points for longer strips.
Enhancing Your Installation: Tips for a Professional Finish
Beyond cutting and connecting, a few extra steps can elevate your LED strip installation to a professional standard.
- Utilize Aluminum Profiles: For a sleek, diffused look and improved heat dissipation (which prolongs LED lifespan), consider installing your LED strips within aluminum channels. These profiles also offer physical protection and make installation cleaner.
- Plan Cable Management: Conceal wires and power supply units as much as possible for a tidy appearance. Use wire clips, tie wraps, or raceways to keep everything organized and out of sight.
- Consider Dimmers and Controllers: Incorporating a dimmer or a smart controller allows you to adjust brightness, change colors, and set schedules, significantly enhancing the functionality and ambiance of your lighting.
Conclusion
Cutting and connecting LED strip lights is an accessible DIY project that empowers you to create custom lighting solutions for any space. By carefully following the steps outlined in this guide – from accurately locating cutting marks and making clean cuts to choosing between solderless connectors and soldering for robust connections – you can achieve professional results safely. Remember to prioritize safety by always disconnecting power and ensuring all connections are properly insulated. With a little precision and the right tools, you can unleash the full creative potential of LED strip lights, transforming your home or project with personalized and dynamic illumination. What unique lighting ideas will you bring to life with your custom LED strips?
Câu Hỏi Thường Gặp
How do I know where to cut an LED strip light?
LED strip lights have designated cutting marks, typically indicated by a small scissor symbol or a copper line, at regular intervals along their length. Always cut directly on these marks to ensure you don’t damage the internal circuitry and that the strip remains functional for reconnection.
Can I cut LED strip lights anywhere?
No, you cannot cut LED strip lights anywhere. Cutting outside the designated marks will permanently damage the circuit, rendering that section of the strip (and potentially subsequent sections) unusable. Always locate and use the marked cutting points.
What happens if I cut an LED strip light in the wrong place?
If an LED strip light is cut in the wrong place, you will likely sever the internal electrical pathways, causing the segment beyond the cut to stop working. This often means you’ll have to discard the damaged section and recut at the next designated mark.
Are LED strip light connectors reliable?
Yes, high-quality LED strip light connectors are generally reliable for most indoor DIY applications. They provide a quick, solder-free connection. However, for outdoor use, high-vibration environments, or installations requiring maximum durability, soldered connections are often preferred due to their superior physical and electrical integrity.
Do I need to insulate my LED strip connections?
Absolutely. Whether you use solderless connectors or solder, it’s crucial to insulate all exposed electrical connections using heat shrink tubing, electrical tape, or the connector’s built-in sealing mechanism. This prevents short circuits, protects against moisture and dust, and ensures user safety.