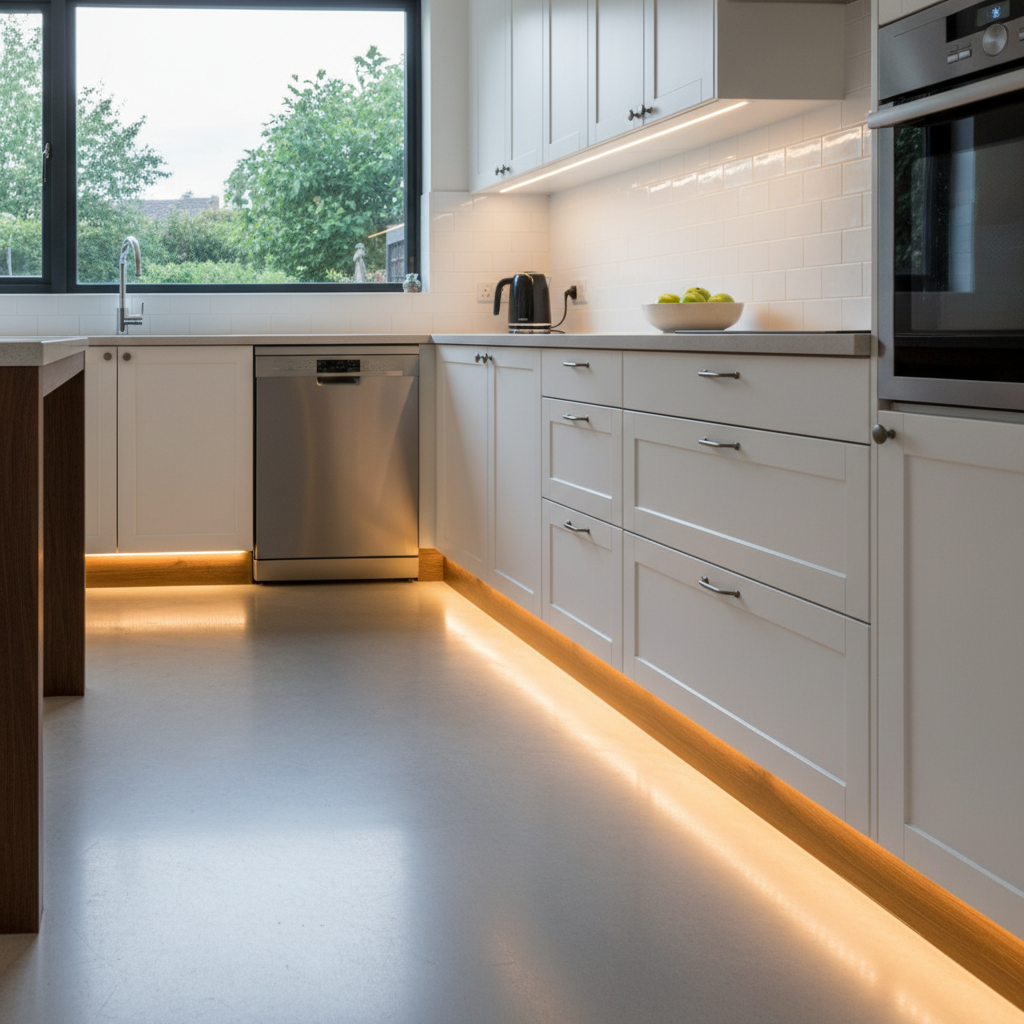
Imagine stepping into your kitchen at night, not fumbling for blinding overhead lights, but greeted by a soft, inviting glow emanating from the base of your cabinets. This subtle yet powerful design element is toe kick lighting, and it’s rapidly becoming a must-have for modern kitchens. Far more than just an aesthetic upgrade, well-chosen LED strip lights for your kitchen toe kicks can transform your space into a safer, more stylish, and incredibly inviting environment. If you’re looking to elevate your kitchen’s ambiance and functionality in 2026, understanding the best LED strip options is your first step.
LED Strip Lights: An Overview and Their Applications in Kitchen Toe Kicks
LED strip lights, often called LED tape lights or rope lights, are a versatile lighting solution composed of numerous small light-emitting diodes (LEDs) mounted on a flexible circuit board. This design allows them to be bent and shaped to fit various contours, making them ideal for discreet installations like under-cabinet toe kicks. Their inherent flexibility and low profile have made them a favorite for both functional and decorative lighting.
In the kitchen, LED strip lights placed in the toe kick area – the recessed space at the bottom of your cabinets – serve multiple purposes. They create a “floating” effect for your cabinetry, adding a touch of contemporary sophistication. Beyond aesthetics, they provide practical pathway illumination, enhancing safety during late-night trips to the kitchen by offering a soft, glare-free light that guides your way without disturbing others. They can also highlight your flooring or backsplash, subtly elevating your kitchen’s overall design.
The Superior Advantages of LED Strip Lights for Kitchen Toe Kicks
Choosing LED strip lights for your kitchen toe kicks comes with a host of benefits that make them a standout choice over traditional lighting options.
Firstly, energy efficiency is a major draw. LED technology consumes significantly less power than incandescent or halogen bulbs, translating into lower electricity bills and a smaller carbon footprint. This efficiency doesn’t compromise on light quality, offering bright illumination with minimal energy expenditure.
Next, their exceptional longevity means fewer replacements and less maintenance. Most LED strips boast tens of thousands of hours of operational life, far outlasting conventional bulbs. This durability ensures your toe kick lighting remains a reliable feature of your kitchen for years to come.
Flexibility and ease of installation are key benefits. LED strips can be cut to specific lengths and often feature adhesive backing, allowing for a straightforward DIY installation. Their slim profile means they can be tucked away discreetly, providing illumination without being overtly visible. Many systems also offer dimmability, giving you complete control over the light intensity to match any mood or time of day.
Furthermore, LED strip lights offer unparalleled versatility in color and effects. From warm white for a cozy atmosphere to cool white for a crisp, modern look, or even full RGB color-changing options, you can customize the ambiance of your kitchen to suit your preferences. They are also safe to use, emitting very little heat and containing no harmful chemicals like mercury, making them an eco-friendly choice for your home.
Comparing Popular LED Strip Light Types for Kitchen Toe Kicks
When selecting LED strips for your kitchen toe kicks, understanding the different types available is crucial. Each offers unique characteristics impacting aesthetics, performance, and cost. Here’s a comparison of common LED strip light types suitable for this application:
| Type of LED Strip | Voltage | Color Options | Typical Power (per meter) | Recommended Brightness (lumens/meter) | Key Features |
|---|---|---|---|---|---|
| Standard SMD White | 12V / 24V | Warm, Neutral, Cool White | 4.8W – 9.6W | 250-500 lm | Dimmable, Peel-and-stick, Cost-effective |
| COB (Chip-on-Board) | 12V / 24V | Warm, Neutral, Cool White | 5W – 10W | 300-600 lm | Dot-free illumination, High density, Flexible |
| RGB/RGBW | 12V / 24V | Full Color Spectrum (RGB), White (RGBW) | 7.2W – 14.4W | 200-400 lm (white) | Color changing, Remote/app control, Dimmable |
| Tunable White (CCT) | 12V / 24V | Adjustable Warm to Cool White | 6W – 12W | 250-550 lm | Dynamic white adjustment, Ambiance control, Dimmable |
- Standard SMD (Surface Mounted Device) White LED Strips are the most common and budget-friendly. They consist of individual LED chips visible along the strip. While versatile, on highly reflective floors, the individual “dots” of light can be noticeable.
- COB (Chip-on-Board) LED Strips feature a high density of small LED chips packaged directly onto the circuit board, resulting in a continuous, uniform line of light without visible hot spots or dots. This makes them an excellent choice for toe kicks, especially if your kitchen has glossy or reflective flooring.
- RGB/RGBW LED Strips offer a full spectrum of colors, allowing you to change the ambiance dramatically. RGBW variants include a dedicated white LED, providing a purer white light than a mixed RGB white. These are perfect for creating dynamic, personalized lighting effects.
- Tunable White (CCT – Correlated Color Temperature) LED Strips allow you to adjust the white light from warm (yellowish) to cool (bluish-white). This flexibility enables you to match your toe kick lighting to other kitchen lights or adapt it to different times of the day or desired moods.
Your Ultimate Buying Guide: Choosing the Right LED Strips for Your Kitchen Toe Kicks
Selecting the perfect LED strips for your kitchen toe kicks involves more than just picking a color. Consider these essential factors to ensure you make an informed decision for your 2026 kitchen upgrade:
1. Determine Your Usage Needs and Kitchen Style
- Ambiance vs. Functionality: Do you primarily want a subtle accent light for mood, or do you need enough illumination for nighttime navigation? This will guide your brightness choice.
- Kitchen Aesthetic: Warm white (2700K-3000K) often complements traditional or rustic kitchens, while cool white (4000K-5000K) suits modern, minimalist designs. RGB allows for a playful, dynamic look.
- Flooring: Highly reflective floors (e.g., polished tile, dark hardwood) will accentuate individual LED dots. For these, higher density strips like COB or those used with diffusers are highly recommended.
|
Our Picks for the Best LED strip light in 2026
As an Amazon Associate I earn from qualifying purchases.
|
||
| Num | Product | Action |
|---|---|---|
| 1 | White Led Strip Lights for Bedroom Small Dimmable LED Lights Strip 16.4ft Super Bright Flexible LED Tape Lights Rope Light for for Room Home Decor Luces Leds for Living Room Kitchen Vanity Mirror |

|
| 2 | Govee 100ft RGBIC LED Strip Lights, Smart LED Lights Work with Alexa and Google Assistant, LED Lights for Bedroom WiFi App Control Segmented DIY Multiple Colors, Color Changing Light, (2 x 50ft) |
|
| 3 | NBBUFF Led Lights for Bedroom 50ft (1 Roll), Color Changing RGB Led Strip Lights with 60 Keys Remote and App Control, Music Sync Led Lights for Room Kitchen Party Home Decor |
|
| 4 | dalattin White LED Strip Lights, 20ft Dimmable Super Bright 24V Led Tape Light 6500K 360 LEDs Lights for Bedrooms, Mirror, Kitchen, Home Decoration Daylight White |
|
| 5 | Govee RGBIC LED Strip Lights, Smart LED Lights for Bedroom, Bluetooth LED Lights APP Control, DIY Multiple Colors on One Line, Color Changing LED Strip Lighting Music Sync, Home Decor, 16.4ft |
|
| 6 | DAYBETTER Led Strip Lights 32.8ft Kit with Remote and Power Supply Color Changing |
|
| 7 | Govee White LED Strip Lights, Upgraded 16.4ft Dimmable LED Light Strip 6500K Bright Daylight White, Strong Adhesive, 300 LEDs Flexible Tape Lights for Mirror, Kitchen Cabinet, Bedroom, Christmas Decor |
|
| 8 | KSIPZE 100ft Led Strip Lights RGB Music Sync Color Changing Led Lights with Smart App Control Remote Led Lights for Bedroom Room Lighting Flexible Home Décor |
|
| 9 | Barrina (6 Pack LED T5 Integrated Single Fixture, 4FT, 2200lm, 6500K Super Bright White, 20W Utility LED Shop Light, Ceiling and Under Cabinet Light, Corded Electric with ON/Off Switch, ETL Listed |
|
| 10 | DAYBETTER LED Strip Lights 110ft, Smart Lighting Strips with App Remote Control, RGB Music Sync Color Changing Lights for Bedroom Kitchen Party Home Decor Luces led para cuarto (1 Roll) |
|
2. Evaluate Key Specifications
- Brightness (Lumens per meter): For a subtle, ambient glow, look for strips in the 75-150 lumens per foot (approximately 250-500 lumens per meter) range. If you desire a slightly brighter accent or more functional lighting, 100-300 lumens per foot (300-1000 lumens per meter) might be suitable. Anything brighter could be overpowering for a toe kick application.
- Color Temperature (CCT):
- Warm White (2700K-3000K): Creates a cozy, inviting atmosphere, popular for many kitchens.
- Neutral White (3500K-4100K): A balanced, crisp white that works well in most settings.
- Cool White (4000K-5000K): Offers a bright, modern, and clean feel.
- RGB/Tunable White: Provides maximum flexibility for color and mood changes.
- Voltage (12V vs. 24V): Both are common, but 24V strips are generally more efficient for longer runs, minimizing voltage drop and ensuring consistent brightness along the entire length.
- LED Density: A higher number of LEDs per meter will create a more uniform light output, reducing the appearance of individual “hot spots.” COB strips are excellent for achieving a seamless, dot-free look.
- Waterproof Rating (IP Rating): While kitchen toe kicks are typically dry, the area can be prone to spills or steam. An IP20 rating is suitable for dry indoor use, but an IP65 or higher rating offers protection against splashes and moisture, providing added peace of mind.
- Dimmability: Essential for controlling the ambiance. Ensure both your LED strips and your power supply/controller are dimmable.
- Diffusers and Channels: LED aluminum channels with frosted diffusers are highly recommended. They protect the strips from physical damage, dust, and moisture, while also softening the light and eliminating distracting “dotting” effects, especially on reflective surfaces.
3. Consider Brand Reputation and User Reviews
Invest in products from reputable brands known for quality and durability. Check user reviews for insights into real-world performance, ease of installation, and reliability. This due diligence can save you time and frustration in the long run.
4. Set Your Budget
LED strip lights vary widely in price. While it’s tempting to opt for the cheapest option, remember that quality often correlates with performance and lifespan. Balance your desired features with a realistic budget, understanding that a slightly higher upfront investment can lead to better results and fewer issues over time.
Top LED Strip Light Brands for Kitchen Toe Kicks
The market offers a wide array of LED strip light brands, but a few stand out for their quality, innovation, and suitability for kitchen toe kick applications. Brands like Govee are popular for their smart RGBIC LED strips, offering extensive color customization and smart home integration. For those seeking premium, dot-free lighting, Flexfire LEDs provides professional-grade options, including high-density COB strips and customizable solutions. Philips Hue is another top contender, known for its smart lighting ecosystem that integrates seamlessly with home automation, though often at a higher price point. Other reliable providers include Super Bright LEDs and AspectLED, which offer a range of products from basic white strips to more advanced tunable white and RGB options, often with robust accessory selections like aluminum channels and diffusers. QTL (formerly Q-Tran) specializes in sophisticated, high-performance LED lighting solutions, including encapsulated fixtures designed for challenging environments. When exploring these brands, look for models that emphasize high LED density, good color rendering index (CRI), and compatibility with dimmers and controllers.
Installation and Maintenance Tips for Your Kitchen Toe Kick LED Strips
Installing LED strip lights in your kitchen toe kicks can be a rewarding DIY project. Here’s how to do it correctly and keep them running optimally:
Mẹo Lắp Đặt (Installation Tips)
- Plan and Measure: Accurately measure the length of your toe kicks, including around corners and appliances like refrigerators or dishwashers. Plan the routing of your strips, power wires, and the location of your power supply and controller.
- Gather Supplies: You’ll need the LED strips, a compatible power supply (driver), a controller/dimmer, connectors (L-shaped, pigtail, or solderless), and ideally, aluminum channels with diffusers.
- Prepare the Surface: Clean the installation surface thoroughly. Ensure it’s dry and free of dust or grease for optimal adhesive bond.
- Cut the Strips: LED strips have designated cut marks (usually every few inches). Cut only at these marks using sharp scissors to avoid damaging the circuit.
- Connect the Sections: Use solderless connectors for easy, tool-free connections around corners or between different runs. For a more robust connection, soldering is also an option.
- Mount the Strips: If using aluminum channels, first secure the channels to the toe kick area. Then, peel the adhesive backing from the LED strips and carefully press them into the channels. For optimal diffusion and to prevent spotting, angle the channels so the light bounces off the toe kick panel rather than shining directly down onto the floor.
- Wire Everything Up: Connect your LED strips to the controller, and then the controller to the power supply. Ensure all connections match the specified voltage (12V or 24V).
- Test Before Finalizing: Before securing everything permanently, plug in your system and test all segments of the lighting, checking for consistent brightness, color, and dimming functionality.
Lưu Ý Về An Toàn Điện (Electrical Safety Notes)
Always unplug the power supply from the wall outlet before making any cuts or connections to the LED strips or wiring. Ensure your power supply’s voltage matches your LED strips’ voltage. If you are uncomfortable with electrical work, it’s always best to consult or hire a qualified electrician.
Cách Sử Dụng và Bảo Quản (Usage and Maintenance)
- Regular Cleaning: Periodically wipe down the diffusers and the area around the toe kicks to prevent dust and grime buildup, which can dim the light output and make the area appear dirty.
- Check Connections: Occasionally inspect connections for any looseness or corrosion, especially in areas prone to moisture or movement.
- Use Dimmers: Utilize dimmer switches to adjust brightness, not only for ambiance but also to extend the lifespan of your LEDs by running them at lower intensities when full brightness isn’t needed.
Xử Lý Các Sự Cố Thường Gặp (Common Troubleshooting)
- Flickering Lights: This can often be caused by an overloaded power supply, loose connections, or an incompatible dimmer. Check your wattage requirements and connections.
- Sections Not Lighting Up: This typically points to a faulty connection in that segment or a cut made incorrectly. Inspect the connections carefully.
- Inconsistent Brightness (Voltage Drop): If lights are dimmer at the end of a long run, you might be experiencing voltage drop. Using a 24V system, thicker gauge wire, or injecting power at multiple points can mitigate this.
“Toe kick lighting is a design feature that can truly elevate a kitchen’s aesthetic, adding depth and a touch of luxury. However, paying attention to details like LED density and proper diffusion is crucial to achieve that polished, high-end look.” – Sarah Chen, Senior Lighting Designer at Lumière Design Studio
Conclusion
Incorporating LED strip lights into your kitchen toe kicks is an investment that pays dividends in both style and practicality. By understanding the different types, considering crucial factors like brightness, color temperature, and IP rating, and following best practices for installation and maintenance, you can create a kitchen that feels both contemporary and inviting. In 2026, the versatility and energy efficiency of LED technology make it the smart choice for enhancing your home. Are you ready to step into a kitchen that glows with modern elegance and unparalleled functionality?
Câu Hỏi Thường Gặp
What is the ideal color temperature for kitchen toe kick lighting?
The most popular choice for kitchen toe kick lighting is warm white (around 2700K-3000K) to create a cozy and inviting ambiance. However, neutral white (3500K-4100K) can offer a balanced, modern feel, and cool white (4000K-5000K) can suit very contemporary designs. Ultimately, the best choice depends on your personal preference and overall kitchen aesthetic.
How bright should LED strips for toe kicks be?
For kitchen toe kick lighting, a subtle, ambient glow is typically desired rather than bright task lighting. Aim for LED strips that provide around 75-150 lumens per foot (approximately 250-500 lumens per meter). This range offers enough illumination for safety and ambiance without being overly bright or highlighting floor imperfections too intensely.
Do I need waterproof LED strips for kitchen toe kicks?
While the toe kick area in a kitchen isn’t typically exposed to direct water, it can encounter splashes, spills, and steam. An IP20 rating is generally sufficient for dry indoor areas. However, for added protection and peace of mind, especially in busy kitchens, opting for LED strips with an IP65 or higher waterproof rating is a wise decision.
Can I install LED toe kick lighting myself?
Yes, installing LED toe kick lighting is a popular DIY project due to the flexibility and adhesive backing of LED strips. Most installations involve measuring, cutting the strips at designated marks, connecting segments with solderless connectors, and attaching them to the toe kick area. Always ensure to unplug the power and match voltage requirements for safety.
Do LED toe kick lights highlight dirt and dust on the floor?
One common concern with toe kick lighting is that it can illuminate dust, dirt, and pet hair on the floor, making them more noticeable. This effect can be minimized by choosing a lower brightness setting, a warmer color temperature, and by using light diffusers within aluminum channels to soften the light. Regular cleaning of the kitchen floor is also highly recommended.