Customizing your LED strip lighting can transform any space, but achieving a flawless, long-lasting installation often requires a crucial skill: proper soldering. While plug-and-play connectors offer convenience, they often fall short in durability and reliability for truly professional and permanent setups. Mastering the art of soldering LED strip contacts ensures robust electrical connections, consistent illumination, and a clean aesthetic that elevates your lighting projects.
This guide, brought to you by an LED technician with over a decade of hands-on experience, will demystify the soldering process. We’ll cover everything from understanding your LED strips and gathering the right tools to executing precise soldering techniques, avoiding common pitfalls, and ensuring your custom lighting lasts for years to come. Dive in and discover how to create secure, professional-grade LED strip light connections with confidence.
LED Strip Lights: An Overview and Their Versatile Applications
LED strip lights, also known as LED tape or ribbon lights, are flexible circuit boards populated with surface-mounted LEDs (SMDs) and resistors. These versatile lighting solutions typically operate on low voltages (12V or 24V) and are designed to be cut at specific intervals, offering immense flexibility for custom installations. Understanding the different types is key, especially when preparing for soldering. You’ll encounter single-color strips (with two contact pads: + and -), RGB strips (typically four pads: +, R, G, B), and more advanced RGBW or RGBCCT strips (with five or six pads). Recent innovations like Chip-on-Board (COB) LED strips offer a continuous, dot-free light output and often come with a protective gel coating that needs careful handling during soldering.
Their adaptability makes LED strip lights perfect for a myriad of applications, from intricate under-cabinet lighting and vibrant cove lighting to subtle backlighting for TVs and monitors, and even outdoor accent lighting for pathways and patios. Properly soldered connections are paramount in these applications to withstand environmental factors and ensure consistent performance.
Why Solder? The Superior Advantages of a Proper LED Strip Connection
When it comes to connecting LED strip lights, two main methods stand out: solderless connectors and soldering. While quick connectors offer ease of installation, soldering provides a range of superior advantages that make it the preferred method for durable and professional results. A properly soldered joint creates a permanent, low-resistance electrical pathway, ensuring optimal current flow and preventing issues like flickering or voltage drop that can diminish the brightness of your strip over longer runs. This robust connection is highly resistant to vibration, movement, and environmental stressors, which is particularly crucial for installations in high-traffic areas or outdoors.
Moreover, soldering allows for a much cleaner and more compact finish. Solderless connectors can often be bulky and visible, disrupting the seamless aesthetic of LED strip lights. Soldered joints, when properly insulated, are virtually invisible and can be easily sealed for waterproof applications, offering a level of longevity and reliability that quick connectors simply cannot match. Investing the time to solder correctly means less maintenance, fewer repairs, and a lighting setup that performs flawlessly for years.
| Feature | Soldering | Solderless Connectors |
|---|---|---|
| Connection Strength | Permanent, highly secure | Less robust, prone to loosening over time |
| Electrical Reliability | Excellent, minimal voltage drop | Can be inconsistent, potential for flickering |
| Aesthetics | Clean, compact, custom fit | Bulkier, visible connector housing |
| Durability | High, resistant to vibration/movement | Lower, susceptible to wear and tear |
| Waterproofing Potential | Can be effectively sealed | Often less reliable for long-term outdoor use |
| Skill Level Required | Requires basic soldering skills & tools | Easy, plug-and-play |
| Cost (per connection) | Low, after initial tool investment | Higher per-connector cost |
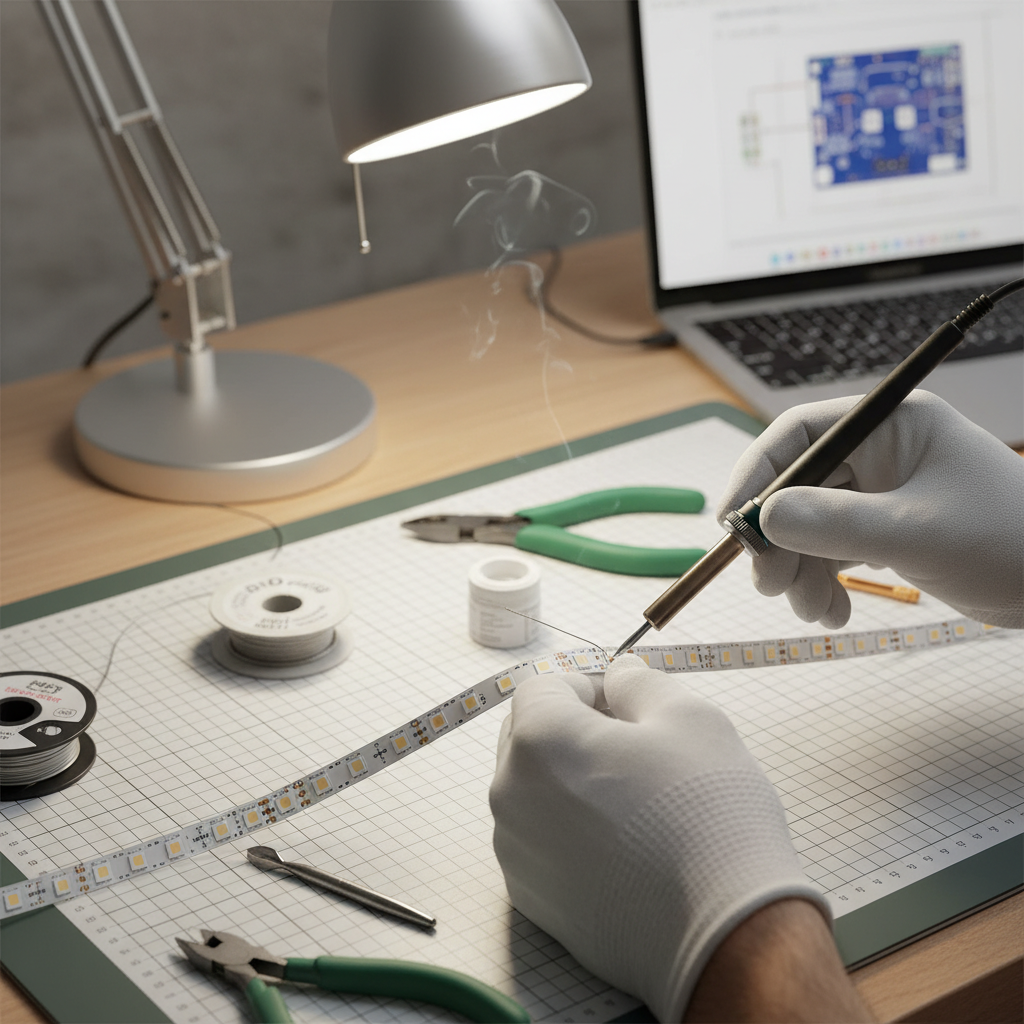
Essential Tools and Materials for Flawless LED Strip Soldering
Before you begin, assembling the right tools and materials is critical for a successful and safe soldering experience. High-quality equipment not only makes the job easier but also contributes to cleaner, more reliable connections.
- Soldering Iron: A temperature-controlled soldering iron (30-60W) is ideal. A fine tip or chisel tip (0.8mm-2mm) is perfect for the small pads on LED strips. Aim for a temperature range of 350-400°C (660-750°F).
- Solder: Use rosin-core electrical solder, preferably lead-free (e.g., SN99.3/CU0.7). A thin gauge (0.6mm-1.0mm) is easier to control for delicate work.
- Wire Strippers & Cutters: Essential for accurately stripping insulation from wires and trimming excess.
- Heat Shrink Tubing: Various sizes (e.g., 2mm-6mm) for insulating soldered joints. A heat gun or lighter is needed to shrink the tubing.
- Third-Hand Tool/Helping Hands: Invaluable for holding the LED strip and wires steady, freeing up both your hands.
- Flux Pen (Optional but Recommended): Liquid flux helps clean the surfaces, improve solder flow, and prevent oxidation, resulting in shinier, stronger joints.
- Isopropyl Alcohol (IPA) & Cotton Swabs: For cleaning copper pads and removing flux residue.
- Safety Glasses: Always protect your eyes from splashes of hot solder or fumes.
- Fume Extractor/Fan: Good ventilation is important to avoid inhaling solder fumes.
- Multimeter: For testing continuity and voltage after soldering to confirm a good connection.
- Desoldering Braid/Pump (Optional): Useful for correcting mistakes.
Step-by-Step Guide: How to Properly Solder LED Strip Contacts
Achieving a clean and strong solder joint is a precise process that requires patience and attention to detail. Follow these steps for successful LED strip light soldering:
Preparation is Key
|
Our Picks for the Best LED strip light in 2026
As an Amazon Associate I earn from qualifying purchases.
|
||
| Num | Product | Action |
|---|---|---|
| 1 | DAYBETTER LED Strip Lights 110ft, Smart Lighting Strips with App Remote Control, RGB Music Sync Color Changing Lights for Bedroom Kitchen Party Home Decor Luces led para cuarto (1 Roll) |

|
| 2 | KSIPZE 100ft Led Strip Lights RGB Music Sync Color Changing Led Lights with Smart App Control Remote Led Lights for Bedroom Room Lighting Flexible Home Décor |
|
| 3 | NBBUFF Led Lights for Bedroom 50ft (1 Roll), Color Changing RGB Led Strip Lights with 60 Keys Remote and App Control, Music Sync Led Lights for Room Kitchen Party Home Decor |
|
| 4 | Govee 100ft RGBIC LED Strip Lights, Smart LED Lights Work with Alexa and Google Assistant, LED Lights for Bedroom WiFi App Control Segmented DIY Multiple Colors, Color Changing Light, (2 x 50ft) |
|
| 5 | White Led Strip Lights for Bedroom Small Dimmable LED Lights Strip 16.4ft Super Bright Flexible LED Tape Lights Rope Light for for Room Home Decor Luces Leds for Living Room Kitchen Vanity Mirror |
|
| 6 | Govee RGBIC LED Strip Lights, Smart LED Lights for Bedroom, Bluetooth LED Lights APP Control, DIY Multiple Colors on One Line, Color Changing LED Strip Lighting Music Sync, Home Decor, 16.4ft |
|
| 7 | dalattin White LED Strip Lights, 20ft Dimmable Super Bright 24V Led Tape Light 6500K 360 LEDs Lights for Bedrooms, Mirror, Kitchen, Home Decoration Daylight White |
|
| 8 | Govee White LED Strip Lights, Upgraded 16.4ft Dimmable LED Light Strip 6500K Bright Daylight White, Strong Adhesive, 300 LEDs Flexible Tape Lights for Mirror, Kitchen Cabinet, Bedroom, Christmas Decor |
|
| 9 | DAYBETTER Led Strip Lights 32.8ft Kit with Remote and Power Supply Color Changing |
|
| 10 | Barrina (6 Pack LED T5 Integrated Single Fixture, 4FT, 2200lm, 6500K Super Bright White, 20W Utility LED Shop Light, Ceiling and Under Cabinet Light, Corded Electric with ON/Off Switch, ETL Listed |
|
- Cut the LED Strip: Always cut your LED strip at the designated cutting marks, usually indicated by a scissor icon and copper pads. These are the only points where the circuit can be safely interrupted.
- Clean the Copper Pads: Even new strips can have residue or oxidation. Gently wipe the copper contact pads with isopropyl alcohol and a cotton swab to ensure a clean surface for soldering.
- Prepare Wires: Strip about 5-10mm (0.2-0.4 inches) of insulation from the ends of your connection wires. Twist the individual strands tightly to prevent fraying.
- Remove Waterproof Coating (if applicable): If working with waterproof (silicone-coated) LED strips, carefully peel back or gently cut away the silicone layer from the contact pads to expose the copper.
- Pre-tin Wires: Heat your soldering iron and apply a small amount of solder to the stripped wire ends until they are fully coated and shiny. This “tinning” process ensures faster, stronger bonds.
- Pre-tin Copper Pads (Optional, but recommended): Briefly touch the soldering iron to each copper pad, then apply a tiny amount of solder. The solder should form a small, domed bead on each pad. This helps solder flow smoothly when connecting the wire.
Making the Solder Joint
- Secure Your Setup: Use a third-hand tool or clamps to hold the LED strip firmly in place. Position the pre-tinned wire so its tinned end aligns perfectly with the corresponding tinned copper pad on the strip.
- Apply Flux (Optional): If you haven’t pre-tinned with rosin-core solder or want extra help, apply a small amount of liquid flux to the tinned pad and wire.
- Heat and Join: With your soldering iron tip clean and hot (around 370°C/700°F), simultaneously touch both the tinned wire and the tinned pad. The solder on both surfaces should melt and flow together, forming a smooth, conical joint. Avoid prolonged heat to prevent damaging the strip.
- Remove Iron and Cool: Once the solder has flowed properly, remove the soldering iron. Keep the wire and strip perfectly still for a few seconds as the solder cools and solidifies. A good joint will appear shiny and smooth, like a small volcano.
- Repeat: Repeat this process for all remaining contact pads, ensuring correct polarity (positive to positive, negative to negative, and correct color channels for RGB/RGBW strips).
Insulating and Protecting the Connection
- Apply Heat Shrink Tubing: Before soldering, remember to slide appropriate-sized heat shrink tubing over your wires. Once all joints are cool and confirmed good, slide the tubing over the soldered connections.
- Shrink the Tubing: Use a heat gun or a lighter (briefly, carefully, and from a safe distance) to evenly shrink the tubing until it forms a tight, protective seal around the connections.
- Reseal Waterproof Strips: For outdoor or wet applications, after heat shrinking, apply a high-quality silicone sealant over the connections to restore waterproofing. Some strips may come with end caps that can be sealed with adhesive.
Testing Your Connections
- Visual Inspection: Examine each joint closely for any signs of cold joints (dull, lumpy solder), solder bridges (solder connecting two pads), or loose wires.
- Continuity Test: Use a multimeter to check for continuity across the soldered connections. This confirms a solid electrical path.
- Power Up: Connect your LED strip to a compatible power supply and turn it on. All segments should illuminate evenly and correctly. If not, troubleshoot the problematic connections.
Common Pitfalls and Troubleshooting in LED Strip Soldering
Even experienced technicians encounter issues. Being aware of common mistakes and knowing how to troubleshoot them will save you time and frustration.
Common Mistakes to Avoid
- Too Much Solder: Applying excessive solder can lead to “solder bridges” where solder accidentally connects two adjacent pads, causing short circuits or incorrect functionality (e.g., all colors lighting up on an RGB strip).
- Overheating the Pads: Leaving the soldering iron on the copper pads for too long can delaminate the flexible PCB, damage the LEDs or resistors, or cause the pads to lift. LED strips are delicate; quick, precise heat is key.
- Cold Joints: These occur when the solder doesn’t fully melt or adhere properly, often due to insufficient heat or movement during cooling. Cold joints look dull, lumpy, or fractured and result in intermittent connections or no connection at all.
- Incorrect Polarity/Crossed Wires: Always double-check your wire connections to ensure positive connects to positive, negative to negative, and the correct color channels are matched. Incorrect wiring can damage the strip or power supply.
- Skipping Insulation: Failing to insulate soldered joints leaves them exposed to shorts, especially in metal channels or if wires touch. Always use heat shrink tubing or electrical tape.
Troubleshooting Your Connections
- Visual Inspection is First: Carefully examine all soldered joints for the issues mentioned above (solder bridges, dull joints, lifted pads).
- Test with a Multimeter: If the strip isn’t working, use a multimeter to check:
- Continuity: Place probes on the corresponding pads on either side of your soldered connection. You should get a beep or a very low resistance reading. If not, the connection is bad.
- Voltage: If you have power, check the voltage across the pads. This can help identify where the power flow stops.
- Reheat and Resolder: For cold joints or poor connections, re-apply the soldering iron to the joint, add a tiny bit of fresh solder, and allow it to flow correctly before removing the iron and letting it cool.
- Desolder and Recut: If a joint is severely bridged or a pad is lifted, it might be necessary to desolder the connection, cut off the damaged section (if possible), and start fresh on a new segment of the strip.
- Clean Residue: Excess flux residue can sometimes become slightly conductive or attract debris. Clean the area with IPA after soldering.
Elevating Your Projects: Advanced Tips and Best Practices
To achieve truly professional and long-lasting LED strip light installations, consider these advanced tips and best practices.
- Tip Selection: For very small contact pads, a fine-point or bevel tip can offer greater precision than a chisel tip. Experiment to find what works best for your specific strips.
- Fume Extraction: Prolonged exposure to solder fumes can be harmful. A small desk fan positioned to blow fumes away from your face or a dedicated fume extractor is highly recommended.
- Practice Makes Perfect: If you’re new to soldering, practice on some scrap wires and an old circuit board or a small piece of LED strip before tackling your main project. This builds confidence and refines your technique.
- Connecting Two Strips: When joining two LED strips end-to-end without wires, align their copper pads perfectly. You can use a small piece of Kapton tape to hold them together temporarily. Then, apply a small bead of solder across each pair of aligned pads, heating both simultaneously to create a strong bridge. Be cautious not to use too much solder, which can create shorts between pads.
- Temperature Management: For high-density or COB LED strips, which might be more sensitive to heat, consider slightly lower iron temperatures (e.g., 350°C) and quicker soldering times to minimize heat exposure.
- Cable Management: Plan your wiring carefully. Use appropriately gauged wires for the current draw of your LED strips to prevent voltage drop and overheating. Neatly routed and secured wiring contributes to both aesthetics and safety.
“A well-soldered connection isn’t just about functionality; it’s about the longevity and aesthetic integrity of your entire LED lighting design. Don’t underestimate the power of a perfectly executed joint.” – [Your Name/Role as Admin of reviewrinv.com], LED Strip Light Specialist
Conclusion
Mastering the art of properly soldering LED strip light contacts is an invaluable skill for anyone looking to create durable, high-performance, and custom lighting installations. While it may seem daunting at first, following a methodical approach—from thorough preparation and selecting the right tools to executing precise soldering techniques and ensuring proper insulation—will yield professional results. The superior electrical conductivity, enhanced durability, and cleaner aesthetics of soldered connections far outweigh the initial learning curve, guaranteeing your LED projects stand the test of time.
So, are you ready to elevate your lighting designs and create truly bespoke LED experiences?
Frequently Asked Questions
Is soldering LED strips difficult for beginners?
While it requires a steady hand and some practice, soldering LED strips is a skill that beginners can absolutely learn. Starting with the right tools, practicing on scrap pieces, and following a step-by-step guide can make the process straightforward and rewarding.
What temperature should my soldering iron be set to for LED strips?
For most LED strip light soldering, a temperature between 350-400°C (660-750°F) is recommended. This range ensures the solder melts quickly and flows smoothly without excessively heating or damaging the delicate components of the LED strip.
Do I need flux when soldering LED strips?
While not strictly mandatory if using rosin-core solder, applying flux (especially with a flux pen) is highly recommended. Flux helps clean the copper pads, prevents oxidation during heating, and significantly improves the flow of solder, leading to shinier, stronger, and more reliable joints.
How do I solder waterproof LED strips?
To solder waterproof LED strips, you first need to carefully remove the silicone or epoxy coating from the copper contact pads. Use a sharp hobby knife to gently peel or cut away the protective layer, exposing the bare copper. After soldering, reseal the connection with marine-grade silicone sealant or a waterproof heat shrink tube with an adhesive lining to maintain water resistance.
What are the alternatives to soldering LED strips?
The primary alternative to soldering LED strips is using solderless connectors (also known as quick connectors or clip-on connectors). These connectors offer a tool-free, plug-and-play solution, making installation very easy. However, they are generally less reliable and durable than soldered connections, more prone to intermittent contact, and often bulkier.