Imagine walking into a room, a closet, or down a hallway, and the lights gently illuminate your path, turning off automatically as you leave. This isn’t just a scene from a smart home commercial; it’s a practical, energy-efficient, and surprisingly achievable DIY project using LED strip lights and motion sensors. Automating your LED strip lighting with motion sensors not only adds a touch of modern convenience to your home but also contributes to significant energy savings and enhanced safety. Whether you’re a seasoned DIY enthusiast or just starting, this comprehensive guide will walk you through the process of creating your own intelligent lighting system.
Understanding LED Strip Lights and Motion Sensors
To successfully automate your lighting, it’s essential to grasp the basics of both LED strip lights and motion sensors. LED strip lights are flexible circuit boards populated with surface-mounted device (SMD) LEDs, often backed with adhesive for easy installation. They typically operate on low-voltage DC power (12V or 24V), making them safe and versatile for various applications. Their construction allows for dynamic lighting options, from single-color accent lighting to full RGB addressable effects.
Motion sensors, on the other hand, are the “eyes” of your automated system. The most common type for DIY projects is the PIR (Passive Infrared) sensor. These sensors work by detecting changes in infrared radiation, which is emitted as heat by living beings. When a warm body moves into the sensor’s field of view, it triggers an electrical signal. Other, more advanced types, like microwave or millimeter-wave (mmWave) sensors, use radar technology to detect movement, often offering more precise and wider coverage, but they are generally found in pre-built kits or smart home integrations rather than basic DIY setups. When combined, a motion sensor detects presence, sends a signal to a controller, and that controller then activates your LED strip lights.
The Benefits of Motion-Activated LED Lighting
Integrating motion sensors with your LED strip lights offers a wealth of advantages that go beyond mere convenience. This intelligent lighting solution can transform your living spaces in numerous positive ways.
One of the most compelling benefits is energy efficiency. Motion-activated lights only consume power when illumination is genuinely needed, significantly reducing wasted electricity in unoccupied areas. This targeted use translates directly into lower energy bills compared to traditional lighting that might be left on unnecessarily.
Beyond savings, the convenience of hands-free illumination is unmatched. Picture carrying groceries into the kitchen or navigating a dark hallway with full hands – your lights simply anticipate your needs. This is particularly beneficial in high-traffic zones, utility rooms, or when entering your home with children or pets.
Enhanced safety and security are also significant advantages. Automatically lit pathways prevent trips and falls in the dark, especially on stairs or in dimly lit corridors. For outdoor applications, motion-activated LED lights can act as a deterrent, startling potential intruders and drawing attention to unusual activity.
Furthermore, by reducing the operational time, motion-activated lighting contributes to an extended lifespan for your LED strip lights. LEDs are known for their durability, but consistently running them shortens their overall life. By only activating when necessary, you maximize your investment. Finally, the aesthetic and ambiance benefits are undeniable. Motion-activated lighting offers a modern, intelligent feel, creating dynamic spaces that adapt to your presence, adding a sophisticated touch to any room.
Essential Components for Your DIY Project
Embarking on a DIY motion-sensor LED project requires a few key components. Understanding each piece will help you choose the right options for your specific needs.
First, you’ll need LED Strip Lights. Consider their voltage (commonly 12V or 24V; 24V is often better for longer runs to minimize voltage drop), color (single-color, RGB for color-changing, or addressable for advanced effects), and brightness (measured in lumens). Next, select your Motion Sensor. For most DIY projects, a PIR module like the HC-SR501 is cost-effective and easy to work with. Alternatively, you can find dedicated inline motion sensor switches designed specifically for LED strips.
The Controller/Microcontroller acts as the brain. For custom logic and intricate effects (like sequential stair lighting), an Arduino or ESP32 board provides programmable control. For simpler plug-and-play setups, dedicated LED motion sensor controllers are readily available. If you want to integrate with your existing smart home, you might consider smart home hubs, though this moves beyond basic DIY wiring.
A crucial element is the Power Supply. It must match the voltage of your LED strip and provide sufficient amperage to power both the strip and your chosen controller. Always calculate the total wattage of your LED strip (watts per meter multiplied by length) and ensure your power supply can handle it, with a little extra headroom. Wiring and connectors such as jumper wires, terminal blocks, solder, and heat shrink tubing will be essential for making secure connections. Lastly, if your LED strip draws significant current and your motion sensor or microcontroller can’t directly handle it, a Transistor or MOSFET will be necessary to act as an electronic switch, amplifying the sensor’s signal to control the higher current of the LED strip.
Step-by-Step DIY: Connecting Motion Sensors to LED Strip Lights
Automating your LED strip lights with motion sensors can be approached in several ways, from simple plug-and-play to more complex programmable systems. Let’s explore two common DIY methods.
Section 1: Basic PIR Sensor & LED Strip (Non-Microcontroller)
This method is ideal for those seeking a straightforward, beginner-friendly setup for areas like closets or under-cabinet lighting.
- Gather Materials: You’ll need a 12V or 24V LED strip, a compatible 12V/24V power supply, and an inline LED motion sensor switch (these typically integrate the sensor and switch into one unit, often with adjustable delay and sensitivity).
- Understand the Components: The inline motion sensor switch will have input (from power supply) and output (to LED strip) terminals.
- Wiring Diagram:
- Connect the positive (+) and negative (-) wires from your power supply to the corresponding input terminals of the inline LED motion sensor switch. Ensure correct polarity (red to +, black to -).
- Connect the positive (+) and negative (-) output wires from the motion sensor switch to the corresponding input terminals of your LED strip light. Again, verify polarity.
Our Picks for the Best LED strip light in 2026As an Amazon Associate I earn from qualifying purchases.Num Product Action 1 DAYBETTER LED Strip Lights 110ft, Smart Lighting Strips with App Remote Control, RGB Music Sync Color Changing Lights for Bedroom Kitchen Party Home Decor Luces led para cuarto (1 Roll) 
2 DAYBETTER Led Strip Lights 32.8ft Kit with Remote and Power Supply Color Changing
3 Govee White LED Strip Lights, Upgraded 16.4ft Dimmable LED Light Strip 6500K Bright Daylight White, Strong Adhesive, 300 LEDs Flexible Tape Lights for Mirror, Kitchen Cabinet, Bedroom, Christmas Decor
4 dalattin White LED Strip Lights, 20ft Dimmable Super Bright 24V Led Tape Light 6500K 360 LEDs Lights for Bedrooms, Mirror, Kitchen, Home Decoration Daylight White
5 Barrina (6 Pack LED T5 Integrated Single Fixture, 4FT, 2200lm, 6500K Super Bright White, 20W Utility LED Shop Light, Ceiling and Under Cabinet Light, Corded Electric with ON/Off Switch, ETL Listed
6 Govee RGBIC LED Strip Lights, Smart LED Lights for Bedroom, Bluetooth LED Lights APP Control, DIY Multiple Colors on One Line, Color Changing LED Strip Lighting Music Sync, Home Decor, 16.4ft
7 NBBUFF Led Lights for Bedroom 50ft (1 Roll), Color Changing RGB Led Strip Lights with 60 Keys Remote and App Control, Music Sync Led Lights for Room Kitchen Party Home Decor
8 KSIPZE 100ft Led Strip Lights RGB Music Sync Color Changing Led Lights with Smart App Control Remote Led Lights for Bedroom Room Lighting Flexible Home Décor
9 White Led Strip Lights for Bedroom Small Dimmable LED Lights Strip 16.4ft Super Bright Flexible LED Tape Lights Rope Light for for Room Home Decor Luces Leds for Living Room Kitchen Vanity Mirror
10 Govee 100ft RGBIC LED Strip Lights, Smart LED Lights Work with Alexa and Google Assistant, LED Lights for Bedroom WiFi App Control Segmented DIY Multiple Colors, Color Changing Light, (2 x 50ft)
- Testing and Adjustments: Plug in your power supply. The LED strip should turn on when motion is detected and turn off after a set delay. Most inline switches have small dials or jumpers to adjust detection sensitivity and the “off” delay time. Experiment with these settings to find what works best for your space.
Section 2: Arduino-Controlled Motion-Activated LED Strip (for custom effects)
For more advanced control, such as fading effects, sequential lighting, or integrating multiple sensors, an Arduino (or similar microcontroller) is an excellent choice.
- Gather Materials:
- Arduino Uno (or compatible board)
- PIR motion sensor module (e.g., HC-SR501)
- LED strip light (single color or addressable RGB like NeoPixels)
- Compatible power supply (e.g., 12V for LED strip, 5V for Arduino if not powered by LED strip PSU)
- N-Channel MOSFET (e.g., IRF520) and a 10k Ohm resistor (for controlling non-addressable LED strips)
- Jumper wires, breadboard (for prototyping)
- Wiring Diagram (Non-Addressable LED Strip with MOSFET):
- PIR Sensor Connection:
- VCC pin of PIR to Arduino’s 5V pin.
- GND pin of PIR to Arduino’s GND pin.
- OUT pin of PIR to an Arduino digital input pin (e.g., D2).
- LED Strip Connection:
- Positive (+) wire of LED strip directly to the positive (+) terminal of the 12V power supply.
- Negative (-) wire of LED strip to the Drain pin of the MOSFET.
- MOSFET Connection:
- Source pin of MOSFET to the negative (-) terminal of the 12V power supply.
- Gate pin of MOSFET to an Arduino digital output pin (e.g., D9) through a 10k Ohm resistor (to protect the Arduino pin and pull the gate low when the Arduino pin is not active).
- Arduino Power: Power the Arduino separately with its USB cable or from the 12V power supply using a buck converter, ensuring a common ground connection between the Arduino and the LED strip’s power supply.
- PIR Sensor Connection:
- Basic Arduino Code Structure:
- Include necessary libraries (e.g., Adafruit NeoPixel if using addressable LEDs).
- Define PIR input pin and LED output pin.
- In
setup(), initialize serial communication (for debugging) and set pin modes. - In
loop(), read the state of the PIR sensor. - If motion is detected, turn on the LED strip (set LED output pin HIGH for MOSFET, or run NeoPixel animation).
- Implement a delay after which the LED strip turns off if no further motion is detected.
- Advanced Code Ideas: Explore libraries for smooth fading, or create captivating “runway” effects for stair lighting by controlling individual sections of addressable LED strips. You can also integrate multiple PIR sensors and program different responses.
Safety Precautions:
Always disconnect all power before making any wiring changes. Double-check all connections for correct voltage and polarity. Use appropriately gauged wires and ensure all exposed connections are properly insulated with electrical tape or heat shrink tubing to prevent short circuits.
Popular Applications and Creative Ideas
Motion-activated LED strip lights offer immense versatility, transforming ordinary spaces into dynamic, intuitive environments. Here are some popular applications and creative ideas for your DIY projects:
For enhanced safety and a touch of modern elegance, consider staircase lighting. By installing LED strips under each stair tread, paired with motion sensors at the top and bottom of the staircase, you can achieve captivating “stepping” or “flow” effects, where lights illuminate sequentially as you ascend or descend.
Under-cabinet and closet lighting are classic applications that provide hands-free convenience. Imagine opening your kitchen cabinet and having the interior immediately light up, or stepping into a walk-in closet without fumbling for a switch. These setups are not only practical but also add a luxurious feel to often-overlooked spaces.
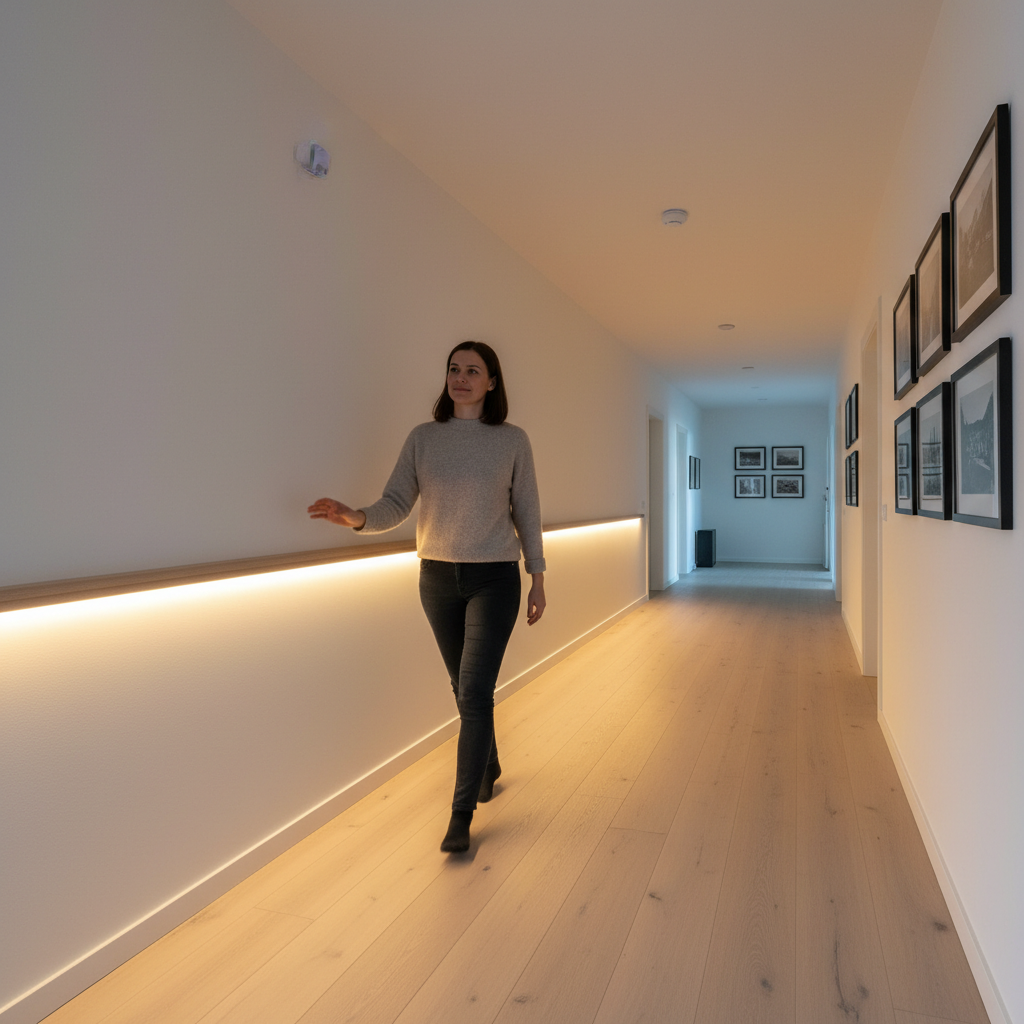
Hallway and pathway lighting can guide your way at night, eliminating the need to turn on bright overhead lights. This subtle illumination is perfect for late-night trips to the bathroom or kitchen, ensuring you navigate your home safely without disturbing others. Similarly, bedside or under-bed lighting offers a gentle glow when your feet hit the floor, ideal for avoiding stumbling in the dark while minimizing harsh light exposure.
For outdoor spaces, motion-activated LED strips (ensure they are appropriately IP-rated for outdoor use) can serve as effective security lighting. Installed near entrances, garages, or along pathways, they provide instant visibility and can deter unwanted guests. The unexpected burst of light can be a simple yet effective security measure.
These applications demonstrate how integrating motion sensors with LED strip lights can not only improve functionality and energy efficiency but also enhance the ambiance and safety of various areas in and around your home.
Choosing the Right Components: A Buying Guide
Selecting the right components is crucial for a successful and satisfying DIY motion-sensor LED project. Thoughtful choices will ensure your system performs as expected and lasts for years.
When it comes to LED Strip Light Considerations, think about the desired brightness and color temperature. Lumens per meter indicate brightness, while Correlated Color Temperature (CCT) dictates whether the light appears warm white (2700K-3000K) for a cozy feel or cool white (5000K-6500K) for task lighting. The voltage (12V or 24V) is important; 24V strips are generally preferred for longer runs as they experience less voltage drop, resulting in more consistent brightness. For outdoor or damp locations, prioritize strips with an adequate waterproofing (IP) rating (e.g., IP65 or higher). The density of LEDs per meter also affects the light’s appearance; higher density means a more continuous glow, while lower density might show individual “hot spots.”
For Motion Sensor Selection, consider the type. PIR sensors are simple and cost-effective for basic detection. If finer, more consistent detection is needed (e.g., detecting subtle movements even when a person is stationary), you might explore mmWave sensors, though these are typically part of more integrated systems. Crucially, check the detection range and angle to ensure it covers your intended area effectively. Features like adjustability for sensitivity, delay time (how long the lights stay on), and a built-in lux sensor (to prevent activation during daylight hours) add significant value.
When selecting Controllers & Power Supplies, always match the voltage and ensure the power supply provides sufficient current (amperage) for your entire LED strip length, plus a buffer. For smart home enthusiasts, consider controllers that offer smart home compatibility (e.g., Zigbee, Wi-Fi) to integrate with platforms like Alexa, Google Assistant, or Home Assistant.
Finally, while many generic options exist, opting for products from reputable brands can provide better reliability and support. Brands like MiBoxer, Flexfire LEDs, and SuperLightingLED often specialize in LED components and offer dedicated motion sensor solutions. For broader smart home integration, consider ecosystems from Philips Hue or IKEA, which offer compatible motion sensors.
Installation Tips and Troubleshooting
A successful DIY project isn’t just about wiring; it’s also about proper installation and knowing how to troubleshoot common issues.
For mounting, strategic placement of your motion sensor is key. Avoid placing it directly above or near heat sources (like vents or radiators) or in direct sunlight, as these can cause false triggers. Position it to cover the primary area of movement. For LED strips, ensure the surface is clean and dry before applying adhesive backing. For a more professional finish and better heat dissipation, consider using aluminum channels with diffusers, securing them with clips or screws.
When it comes to wiring best practices, keep wire runs as short as possible to minimize voltage drop, especially for 12V systems. Always use appropriately gauged wire that can handle the current draw of your LED strip. Ensure all connections are secure, whether through soldering, screw terminals, or quick connectors, and always insulate any exposed wires to prevent short circuits and ensure safety.
Even with careful planning, you might encounter issues. Here are some common troubleshooting tips:
- Lights not turning on: First, check your power supply – is it plugged in and supplying power? Verify all wiring connections for correct polarity and secure contact. Ensure the sensor placement isn’t obstructed or aimed incorrectly.
- Lights staying on too long/short: This is usually an issue with the delay adjustment on your motion sensor or controller. Refer to its manual and adjust the timer setting.
- False triggers: If lights are turning on without apparent motion, your sensor sensitivity might be too high. Adjust it down. Environmental factors like pets, curtains moving in a draft, or even rapid temperature changes can also cause false alarms. Try repositioning the sensor or reducing its sensitivity.
- Flickering: This can indicate an inadequate power supply (not enough amperage), loose connections, or even a faulty LED strip or controller. Check all connections and ensure your power supply meets the wattage requirements of your LED strip.
By following these tips and knowing how to diagnose basic problems, you’ll be well-equipped to install and maintain your DIY motion-activated LED strip lighting system.
Conclusion
Automating your LED strip lights with motion sensors is a rewarding DIY project that brings together convenience, energy efficiency, and enhanced safety. From illuminating dark staircases to providing hands-free lighting in closets and hallways, the possibilities are vast. By understanding the components, following proper wiring and installation techniques, and knowing how to troubleshoot, you can create a customized, intelligent lighting system that perfectly suits your home and lifestyle. Embrace the power of smart lighting and transform your spaces with the flick of a (motion-activated) switch. What exciting new ways will you use motion-activated LED strip lights in your home?
Câu Hỏi Thường Gặp
What type of motion sensor is best for LED strip lights?
For most DIY LED strip light projects, a Passive Infrared (PIR) motion sensor is an excellent choice. They are cost-effective, readily available, and simple to integrate, making them ideal for detecting human movement in areas like hallways, closets, or under cabinets.
Can I use a motion sensor with any LED strip light?
Yes, generally you can use a motion sensor with almost any LED strip light, provided you have a compatible controller or switch that bridges the sensor’s signal to the LED strip’s power. The key is to match the voltage requirements (e.g., 12V or 24V) between your LED strip, controller, and power supply.
How do I power my DIY motion sensor LED project?
Your DIY project will typically be powered by a low-voltage DC power supply (e.g., 12V or 24V DC adapter) that matches the voltage of your LED strip lights. This power supply connects to your controller or motion sensor switch, which then regulates the power to the LED strip.
How can I prevent false triggers from my motion sensor?
To prevent false triggers, carefully choose the sensor’s mounting location, avoiding direct sunlight, heat sources, or areas with drafts that might move objects like curtains. Additionally, many motion sensors have adjustable sensitivity settings; lowering the sensitivity can help reduce unwanted activations.
What’s the difference between a PIR sensor and a smart home motion sensor?
A PIR sensor is a basic component that detects infrared changes to signal motion. A “smart home motion sensor” typically integrates a PIR (or other advanced sensor types like mmWave) with wireless communication (Wi-Fi, Zigbee, Z-Wave) to connect to a smart home hub. This allows for broader automation, integration with other smart devices, and remote control via apps.