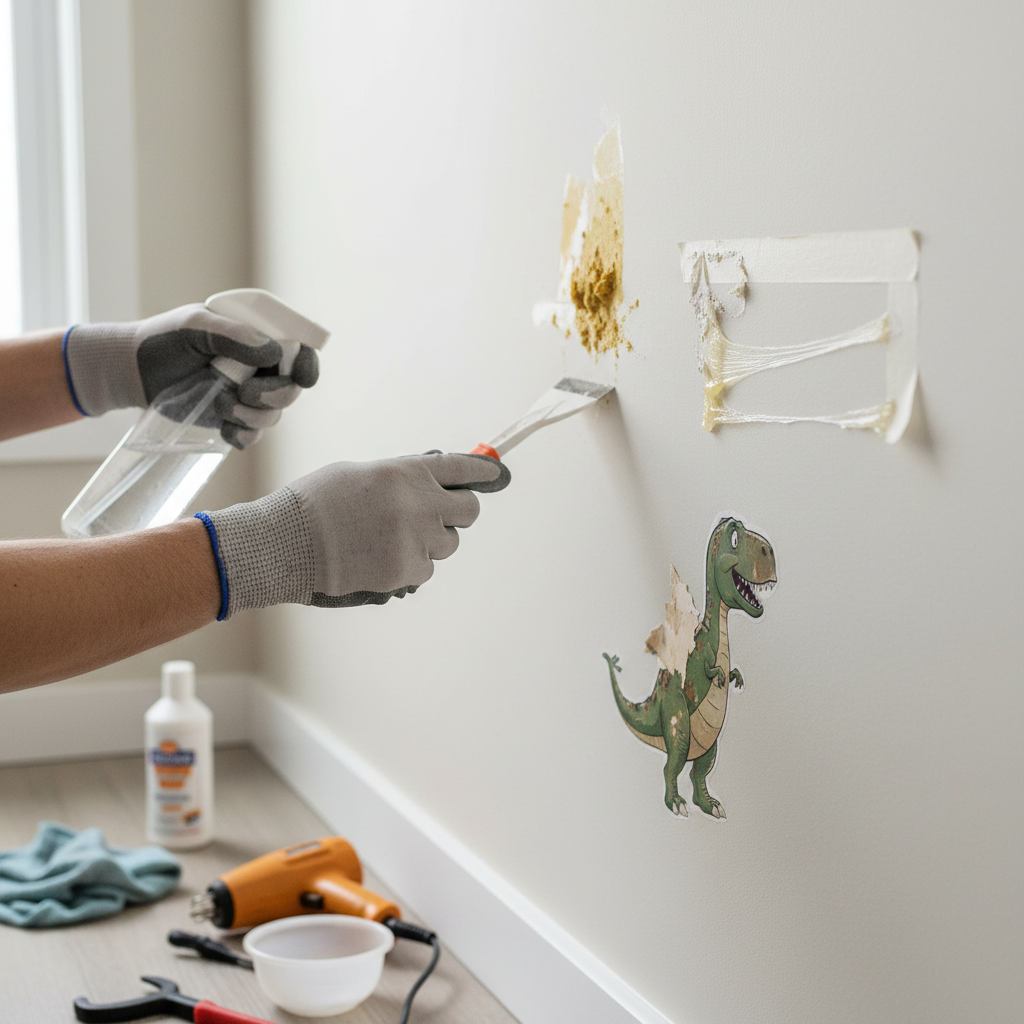
Stubborn adhesive residue on your walls can be a homeowner’s persistent nightmare. Whether it’s remnants from old mounting strips, forgotten painter’s tape, playful wall decals, or even heavy-duty construction glue, leftover adhesive often mars an otherwise pristine wall. Attempting to paint over it results in an uneven, unsightly finish, and improper removal can lead to damaged paint, frustrating stains, or even torn drywall. But don’t fret! With the right techniques, patience, and a few common household items, you can effectively remove old adhesive from your walls safely, restoring them to their smooth, clean state without causing any unwanted damage.
Understanding Wall Adhesive and Why It’s Stubborn
Adhesives are materials designed to create a strong, lasting bond between two surfaces. Their effectiveness comes from their chemical composition, which allows them to stick firmly to various materials like paint, plaster, and drywall. Over time, these bonds can strengthen further, and the adhesive itself can harden, becoming even more challenging to remove.
Common culprits for lingering adhesive include residue from:
- Mounting Strips and Hooks: Often used for hanging pictures or decor, these can leave behind a gummy, often clear residue.
- Painter’s Tape or Duct Tape: If left on too long, the adhesive on these tapes can “cure” onto the wall surface, making removal difficult.
- Wall Decals and Stickers: While fun for decoration, peeling these off can frequently leave behind sticky remnants.
- Double-Sided Tape: Designed for strong bonding, it’s no surprise that this type of tape leaves behind tenacious glue.
- Construction Adhesives: For heavy-duty applications, these glues are incredibly strong and pose the biggest challenge.
The primary risk of improper adhesive removal is surface damage. Aggressive scraping can peel paint, gouge plaster, or tear the paper facing off drywall, leading to costly repairs. Using harsh chemicals without proper knowledge can also strip paint or stain your walls. Understanding the nature of the adhesive and your wall surface is the first step to a successful, damage-free removal process.
Essential Preparations Before You Begin
Before you tackle that sticky mess, a little preparation goes a long way in protecting your walls and ensuring a smooth removal process.
First, assess your wall type. Painted drywall is the most delicate and requires the gentlest touch, as it’s prone to paint damage and moisture absorption. Plaster, tile, and glass surfaces are generally more durable and can withstand stronger methods. Knowing your surface will help you choose the safest and most effective approach.
Next, gather your supplies. Having everything on hand saves time and frustration. You’ll likely need:
- Microfiber cloths or soft rags
- Mild dish soap
- Warm water
- White vinegar (distilled)
- Rubbing alcohol (isopropyl alcohol) – use with caution on painted surfaces
- Natural oils (baby oil, olive oil, peanut butter, mayonnaise)
- Hair dryer or heat gun (on a low setting)
- Plastic scraper, old credit card, or putty knife
- Drop cloths or old sheets
- Painter’s tape
- Rubber gloves and safety goggles
Finally, protect your workspace. Move any furniture away from the wall to prevent accidental spills or damage. Lay down drop cloths or old newspapers to protect your flooring. If you’re working near electrical outlets, it’s wise to turn off the power at the breaker and cover the outlets with painter’s tape to avoid any hazards, especially when using liquid solutions.
“Patience is your best tool when removing old adhesive. Rushing the process often leads to more damage than the adhesive itself.”
Gentle Methods for Adhesive Removal
Starting with the least invasive methods is always recommended, especially on painted walls. These gentle approaches are often effective for lighter residues and minimize the risk of damage.
Warm Soapy Water
One of the simplest and safest methods, warm soapy water is excellent for loosening softer, less stubborn adhesives like those from tape or light stickers.
- Preparation: Mix a few drops of mild dishwashing liquid with warm water in a spray bottle or a bucket.
- Application: Lightly spray or dab the solution onto the adhesive residue. Do not oversaturate the wall, particularly if it’s drywall.
- Action: Let the solution sit for 5-10 minutes to allow the adhesive to soften.
- Removal: Gently wipe away the softened glue with a clean microfiber cloth. For more stubborn spots, use a plastic scraper or an old credit card, always scraping at a shallow angle to avoid damaging the wall. Rinse the cloth frequently.
|
Our Picks for the Best LED strip light in 2026
As an Amazon Associate I earn from qualifying purchases.
|
||
| Num | Product | Action |
|---|---|---|
| 1 | White Led Strip Lights for Bedroom Small Dimmable LED Lights Strip 16.4ft Super Bright Flexible LED Tape Lights Rope Light for for Room Home Decor Luces Leds for Living Room Kitchen Vanity Mirror |

|
| 2 | dalattin White LED Strip Lights, 20ft Dimmable Super Bright 24V Led Tape Light 6500K 360 LEDs Lights for Bedrooms, Mirror, Kitchen, Home Decoration Daylight White |
|
| 3 | DAYBETTER Led Strip Lights 32.8ft Kit with Remote and Power Supply Color Changing |
|
| 4 | Govee White LED Strip Lights, Upgraded 16.4ft Dimmable LED Light Strip 6500K Bright Daylight White, Strong Adhesive, 300 LEDs Flexible Tape Lights for Mirror, Kitchen Cabinet, Bedroom, Christmas Decor |
|
| 5 | Govee 100ft RGBIC LED Strip Lights, Smart LED Lights Work with Alexa and Google Assistant, LED Lights for Bedroom WiFi App Control Segmented DIY Multiple Colors, Color Changing Light, (2 x 50ft) |
|
| 6 | NBBUFF Led Lights for Bedroom 50ft (1 Roll), Color Changing RGB Led Strip Lights with 60 Keys Remote and App Control, Music Sync Led Lights for Room Kitchen Party Home Decor |
|
| 7 | KSIPZE 100ft Led Strip Lights RGB Music Sync Color Changing Led Lights with Smart App Control Remote Led Lights for Bedroom Room Lighting Flexible Home Décor |
|
| 8 | DAYBETTER LED Strip Lights 110ft, Smart Lighting Strips with App Remote Control, RGB Music Sync Color Changing Lights for Bedroom Kitchen Party Home Decor Luces led para cuarto (1 Roll) |
|
| 9 | Govee RGBIC LED Strip Lights, Smart LED Lights for Bedroom, Bluetooth LED Lights APP Control, DIY Multiple Colors on One Line, Color Changing LED Strip Lighting Music Sync, Home Decor, 16.4ft |
|
| 10 | Barrina (6 Pack LED T5 Integrated Single Fixture, 4FT, 2200lm, 6500K Super Bright White, 20W Utility LED Shop Light, Ceiling and Under Cabinet Light, Corded Electric with ON/Off Switch, ETL Listed |
|
Heat Application (Hair Dryer or Heat Gun)
Heat can work wonders by softening the adhesive bond, making it easier to peel or scrape away. This method is particularly effective for sticker residue or adhesive from command strips.
- Preparation: Ensure your workspace is clear and you have a plastic scraper ready.
- Application: Hold a hair dryer (on a medium-low setting) or a heat gun (on the lowest setting) a few inches from the adhesive. Move the heat source constantly to avoid concentrating heat in one spot.
- Action: Apply heat for 30-60 seconds, or until the adhesive visibly softens and becomes pliable.
- Removal: Immediately and gently scrape the softened adhesive with a plastic scraper. You can also try carefully peeling it off by hand if it’s a larger piece. If it hardens again, reapply heat.
White Vinegar Solution
White vinegar is a natural cleaner and a surprisingly effective solvent for many types of adhesive, without being overly harsh on painted surfaces.
- Preparation: Mix equal parts white vinegar and warm water in a spray bottle. For sponging, a 1 part vinegar to 6 parts water mixture can also work.
- Application: Spray or dab the vinegar solution directly onto the adhesive.
- Action: Allow it to soak for a few minutes. The acetic acid in vinegar helps to break down the adhesive.
- Removal: Wipe the softened residue away with a clean cloth. You may need to repeat the process for thicker layers.
Natural Oils (Baby Oil, Olive Oil, Peanut Butter, Mayonnaise)
Various household oils can break down the stickiness of adhesive by saturating and loosening its bond. This method is particularly good for delicate surfaces.
- Preparation: Have a clean cloth ready.
- Application: Apply a small amount of baby oil, olive oil, vegetable oil, or even a thin layer of peanut butter or mayonnaise directly onto the adhesive.
- Action: Let it sit for 15-30 minutes, allowing the oil to penetrate the glue.
- Removal: Gently rub the area with a clean cloth, using circular motions. The adhesive should start to loosen and roll off. Wipe away any oily residue with a clean, damp cloth and then dry the area. Always test a small, inconspicuous area first to ensure the oil doesn’t stain or discolor your wall.
When to Use Stronger Solutions and Commercial Removers
For adhesives that resist gentle methods, you might need to escalate to stronger solvents or specialized commercial products. However, caution is paramount with these options, as they can potentially damage paint or release strong fumes.
Rubbing Alcohol (Isopropyl Alcohol)
Rubbing alcohol is a good solvent for many glues but can also dissolve certain types of paint.
- Caution: Always test rubbing alcohol in an inconspicuous area first to ensure it doesn’t strip your paint.
- Application: Apply a small amount to a clean cloth, then dab or gently rub the adhesive.
- Action: The alcohol helps break down the adhesive.
- Removal: Wipe away the residue. Rinse the area with clean water afterwards.
Commercial Adhesive Removers (e.g., Goof Off, Goo Gone)
These products are formulated to tackle tough, dried-on adhesives.
- Selection: Read product labels carefully. Look for options specifically marked “paint-safe” or “wall-safe.” For instance, Goo Gone spray gel is generally safe for painted walls, but some other Goo Gone products (like the latex paint clean-up spray or wipes) can damage paint.
- Caution: Always ensure adequate ventilation when using these products, as they can emit strong fumes. Wear gloves and eye protection.
- Application: Follow the manufacturer’s instructions precisely. Typically, you apply a small amount to the adhesive, let it sit for the recommended time, and then gently scrape or wipe it away.
- Removal: Wipe the area thoroughly with a clean, damp cloth to remove all product residue, then dry.
Acetone (Nail Polish Remover)
Acetone is a powerful solvent that will quickly dissolve most adhesives.
- Warning: Avoid using acetone on painted walls. It is a paint stripper and will almost certainly remove the paint along with the adhesive. It is best reserved for unpainted, very durable surfaces like glass, metal, or tile.
Sanding (Last Resort for Hardened Adhesives like Super Glue)
For extremely hard, dried, or construction-grade adhesives that no solvent can touch, sanding may be your only recourse. This method will damage the paint and potentially the wall surface, so be prepared for touch-ups or repainting.
- Tools: Use fine-grit sandpaper (180-220 grit) on a sanding block.
- Technique: Work slowly and with light pressure. Gently sand the adhesive in small, circular motions. The goal is to carefully remove the adhesive layer by layer without creating deep gouges in the wall.
- Aftermath: Once the adhesive is gone and the surface is smooth, you will need to clean the dust, prime the spot, and repaint the area to match your wall.
Comparing Adhesive Removal Methods
Choosing the right method is key to a damage-free result. Here’s a comparison to guide your decision:
| Method | Effectiveness | Wall Safety (Painted Drywall) | Common Adhesives | Pros | Cons |
|---|---|---|---|---|---|
| Warm Soapy Water | Low-Medium | High | Light residue, tape, fresh stickers | Safe, inexpensive, readily available | May not work on strong or old glues |
| Heat (Hair Dryer/Gun) | Medium | Medium-High | Stickers, tape, Command Strip residue | Softens quickly, no chemicals | Risk of overheating paint, requires care |
| White Vinegar | Medium | High | Stickers, tape, light glues | Natural, non-toxic, inexpensive | May leave a lingering smell, slower |
| Natural Oils | Medium | High | Tape, light sticker residue | Safe, readily available, gentle | Can leave oily residue, slower process |
| Rubbing Alcohol | Medium-High | Medium (Test first) | Stronger tape, sticker glue, some glues | Effective on many adhesives | Can strip certain paints, fumes |
| Commercial Removers | High | Varies (Check label) | Tough, old, dried-on adhesives | Very effective, fast-acting | Fumes, potential paint damage if misused |
| Sanding | High (Last Resort) | Low (Damages paint) | Super glue, construction glue, hardened resins | Removes toughest bonds | Requires paint repair, dusty, labor-intensive |
Step-by-Step Guide to Removing Adhesive Safely
Follow these steps for a methodical and safe approach to removing adhesive:
- Prepare the Area: Clear furniture, lay down drop cloths, and cover electrical outlets for safety.
- Identify Adhesive Type & Wall Surface: Determine what kind of adhesive you’re dealing with and the material of your wall to choose the most appropriate method.
- Test Your Method: Before applying any solution or heat to a visible area, test it on an inconspicuous spot (e.g., behind a door, in a closet) to ensure it doesn’t damage or discolor your paint.
- Apply Solution/Heat: Follow the instructions for your chosen method (soapy water, heat, vinegar, oil, or commercial remover). Apply the substance to the adhesive, letting it soak for the recommended time, or apply heat gradually.
- Soften & Scrape: Once the adhesive has softened, gently scrape it away with a plastic scraper, old credit card, or your fingernail. Always apply light, even pressure and work at a shallow angle to prevent damaging the wall.
- Rinse & Clean: After removing the adhesive, wipe the entire area with a clean cloth dampened with plain warm water. This removes any leftover residue from the adhesive or cleaning solution. Rinse your cloth frequently to avoid spreading grime.
- Dry Thoroughly: Allow the wall to air dry completely. Ensure no moisture remains before proceeding with any further steps like priming or painting.
- Repeat if Necessary: For stubborn or thick layers of adhesive, you may need to repeat the application, soaking, and scraping process multiple times. Patience is key!
Expert Tips for a Flawless Finish
Even with the right method, a few expert tips can make all the difference in achieving a perfectly clean, undamaged wall:
- Work in small sections: This prevents cleaning solutions from drying out and allows you to focus on detailed removal.
- Do not oversaturate drywall: Drywall can absorb too much moisture, leading to damage. Use damp cloths, not dripping wet ones.
- Use light pressure: Aggressive scrubbing or scraping is the fastest way to damage paint or drywall. Let the solution do the work.
- Scrape away from you: Always direct your scraping motions away from your body for safety.
- For textured walls, be extra gentle: Textures can easily be chipped or smoothed down by aggressive scraping. Use softer cloths and less abrasive tools.
- If painting after, ensure all residue is gone: Any remaining adhesive will create an uneven surface and prevent new paint from adhering properly. Clean and dry the wall thoroughly.
Conclusion
Removing old adhesive from walls safely is a common household task that doesn’t have to be daunting. By understanding the type of adhesive and wall surface, preparing your workspace, and patiently applying the right method, you can restore your walls to their original pristine condition. From gentle solutions like warm soapy water and natural oils to more robust commercial removers or cautious heat application, there’s an effective and safe approach for almost every sticky situation. Remember to always start with the least aggressive method and test in an inconspicuous area to protect your walls.
What’s the most stubborn adhesive you’ve ever tackled, and how did you conquer it?
Frequently Asked Questions
What is the best natural way to remove adhesive from walls?
The best natural ways to remove adhesive from walls typically involve warm soapy water, white vinegar diluted with warm water, or various natural oils like baby oil, olive oil, or even peanut butter. These methods are gentle on most painted surfaces, non-toxic, and readily available, working by softening the adhesive bond for easier removal.
Can I use nail polish remover to get glue off painted walls?
It is generally not recommended to use nail polish remover (which typically contains acetone) on painted walls. Acetone is a very strong solvent that can effectively dissolve many types of glue, but it is also a powerful paint stripper and will likely remove the paint from your walls along with the adhesive, requiring repainting.
How do you get sticky residue off walls without removing paint?
To remove sticky residue without damaging paint, start with gentle methods such as warm soapy water, a hair dryer to soften the glue, or a diluted white vinegar solution. Natural oils like baby oil can also be effective. Always test your chosen method on an inconspicuous area first, use soft cloths and plastic scrapers, and avoid aggressive scrubbing.
What should I do if the adhesive is extremely hard?
If the adhesive is extremely hard and resists gentle methods, you might need to use a heat gun on its lowest setting to soften it, followed by careful scraping with a plastic putty knife. As a last resort, fine-grit sandpaper can be used, but be aware this will likely damage the paint and require touch-ups or repainting afterwards. Commercial adhesive removers specifically labeled “paint-safe” can also be considered.
Are there any adhesives that won’t damage wall paint when removed?
Yes, many manufacturers produce “damage-free” adhesives, such as certain types of removable mounting strips or painter’s tape designed to be easily peeled away without leaving residue or stripping paint. When purchasing, look for products explicitly marketed as “wall-safe,” “no-damage,” or “clean removal” to minimize future adhesive removal challenges.