LED strip lights have become a staple in modern home design, offering versatile illumination and creating captivating atmospheres. However, the unsightly tangle of wires and bulky power bricks can quickly detract from the sleek aesthetic these lights promise. Achieving a truly professional and clean look requires thoughtful planning and execution to effectively conceal these necessary components. This guide provides comprehensive DIY strategies to neatly hide LED wires and power supplies, ensuring your lighting enhances your space without any visual distractions.
The Importance of Concealing LED Wires and Power Bricks
While the glow of LED strips is undeniably attractive, visible wires and power supplies can undermine the entire design. Proper concealment isn’t merely about aesthetics; it also contributes to safety and the longevity of your lighting system. Dangling wires can be a trip hazard, and exposed power bricks are vulnerable to dust and accidental damage. By integrating your LED setup seamlessly into your environment, you protect your investment, maintain a tidy space, and elevate your home’s interior design from a DIY project to a polished, professional installation. A clean setup improves the visual appeal, making your lighting appear as an intrinsic part of your home’s architecture, rather than an afterthought.
DIY Methods for Hiding LED Wires
Concealing LED wires effectively depends on the installation location and your preferred level of effort. From simple tucking to more integrated solutions, here are several DIY methods to keep those cables out of sight.
Utilize Cable Management Channels and Raceways
One of the most effective ways to hide LED wires on walls or under cabinets is by using cable management channels or raceways. These typically come in plastic or aluminum and can be adhesive-backed or screwed into place. They create a discreet pathway for your wires, keeping them organized and protected. Many raceways are paintable, allowing them to blend seamlessly with your wall color for an almost invisible finish. Aluminum channels, specifically designed for LED strips, not only conceal the wires but also protect the LED strip itself and can diffuse the light for a softer glow.
- Installation Tip: Measure the length of wire you need to cover and cut the raceway to size. Secure the base of the channel to the surface, lay the wires inside, and then snap on the cover.
|
Our Picks for the Best LED strip light in 2026
As an Amazon Associate I earn from qualifying purchases.
|
||
| Num | Product | Action |
|---|---|---|
| 1 | DAYBETTER Led Strip Lights 32.8ft Kit with Remote and Power Supply Color Changing |

|
| 2 | White Led Strip Lights for Bedroom Small Dimmable LED Lights Strip 16.4ft Super Bright Flexible LED Tape Lights Rope Light for for Room Home Decor Luces Leds for Living Room Kitchen Vanity Mirror |
|
| 3 | dalattin White LED Strip Lights, 20ft Dimmable Super Bright 24V Led Tape Light 6500K 360 LEDs Lights for Bedrooms, Mirror, Kitchen, Home Decoration Daylight White |
|
| 4 | DAYBETTER LED Strip Lights 110ft, Smart Lighting Strips with App Remote Control, RGB Music Sync Color Changing Lights for Bedroom Kitchen Party Home Decor Luces led para cuarto (1 Roll) |
|
| 5 | NBBUFF Led Lights for Bedroom 50ft (1 Roll), Color Changing RGB Led Strip Lights with 60 Keys Remote and App Control, Music Sync Led Lights for Room Kitchen Party Home Decor |
|
| 6 | Barrina (6 Pack LED T5 Integrated Single Fixture, 4FT, 2200lm, 6500K Super Bright White, 20W Utility LED Shop Light, Ceiling and Under Cabinet Light, Corded Electric with ON/Off Switch, ETL Listed |
|
| 7 | KSIPZE 100ft Led Strip Lights RGB Music Sync Color Changing Led Lights with Smart App Control Remote Led Lights for Bedroom Room Lighting Flexible Home Décor |
|
| 8 | Govee RGBIC LED Strip Lights, Smart LED Lights for Bedroom, Bluetooth LED Lights APP Control, DIY Multiple Colors on One Line, Color Changing LED Strip Lighting Music Sync, Home Decor, 16.4ft |
|
| 9 | Govee White LED Strip Lights, Upgraded 16.4ft Dimmable LED Light Strip 6500K Bright Daylight White, Strong Adhesive, 300 LEDs Flexible Tape Lights for Mirror, Kitchen Cabinet, Bedroom, Christmas Decor |
|
| 10 | Govee 100ft RGBIC LED Strip Lights, Smart LED Lights Work with Alexa and Google Assistant, LED Lights for Bedroom WiFi App Control Segmented DIY Multiple Colors, Color Changing Light, (2 x 50ft) |
|
Tuck Wires Behind Furniture and Fixtures
For a quick and easy solution, leverage existing elements in your room. Wires can often be tucked behind:
- Cabinets and Shelves: Route wires along the back edges or inside the structure.
- Wall Trim and Baseboards: Wires can be neatly run along these natural lines of a room.
- Furniture Legs and Frames: Use adhesive clips or zip ties to secure wires along these less visible areas.
This method is particularly useful for installations near entertainment centers, desks, or bed frames where furniture naturally provides cover. Ensure that wires are not pinched or damaged by furniture movement.
Employ Cable Clips and Adhesive Holders
Small, inexpensive cable clips and adhesive holders are invaluable for securing wires in place and preventing them from dangling. These are ideal for short runs of wire, like those leading to a power brick, or for routing wires along the underside of shelves and cabinets.
- Adhesive Clips: Easy to apply and remove, perfect for temporary setups or rented spaces.
- Nail-in Clips: Offer a more permanent and secure hold, suitable for wooden surfaces.
- Velcro Ties: Great for bundling excess wire length, keeping it neat and manageable.
Integrate Wires into Architectural Features
For a more custom and integrated look, consider incorporating wire hiding into your home’s architectural elements:
- Crown Molding: If installing LED strips along the ceiling, wires can be routed inside or behind existing crown molding.
- Wall Cavities: For new constructions or renovations, wires can be run within wall cavities, though this typically requires professional installation and adherence to electrical codes.
- Behind Artwork or Decorative Panels: Create a false back or route wires behind large wall art pieces for clever concealment.
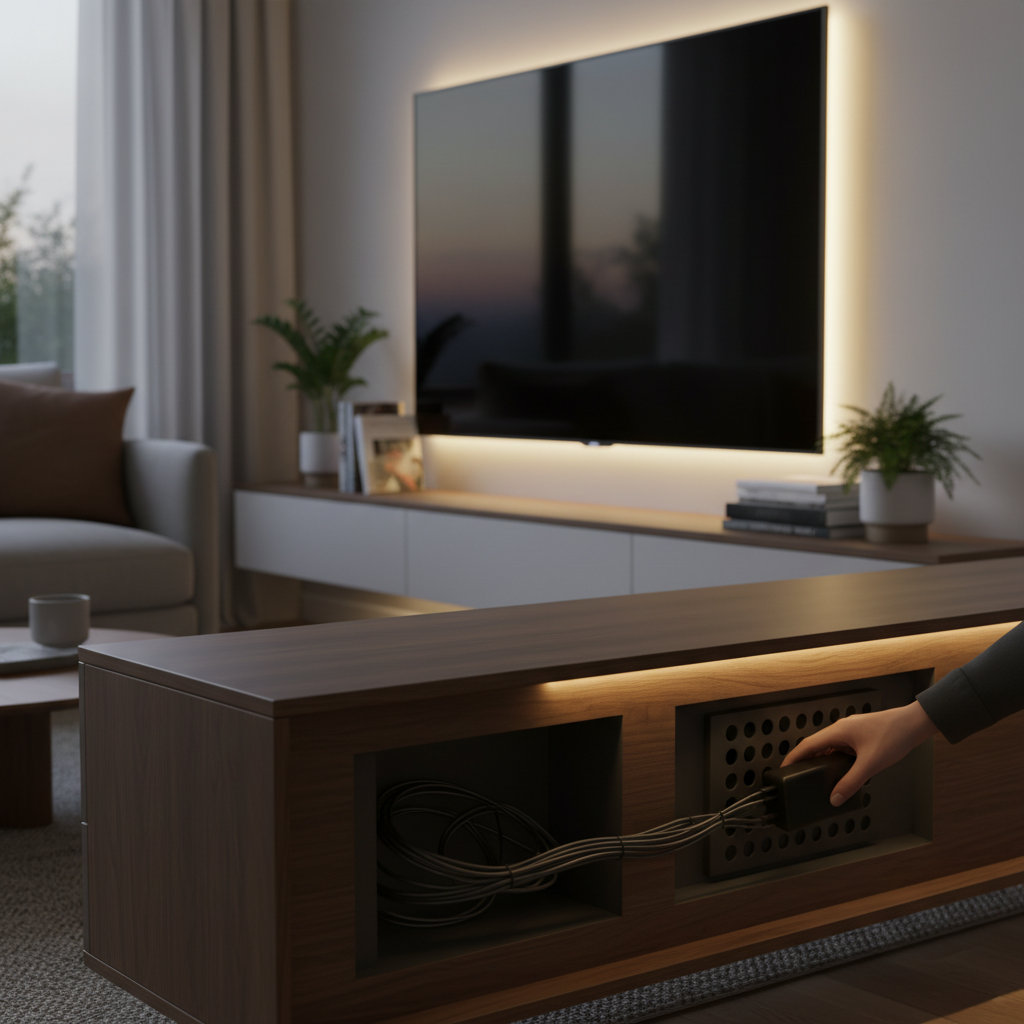
Creative Solutions for Hiding LED Power Bricks
The bulky power brick is often the most challenging component to conceal. Thankfully, several creative solutions can make it disappear while ensuring proper ventilation and accessibility.
Utilize Furniture for Discreet Storage
Furniture offers the most straightforward and often most aesthetically pleasing options for hiding power bricks.
- Behind Cabinets or Entertainment Centers: Position the power brick on a shelf or the floor directly behind the furniture. Ensure there’s adequate space for airflow.
- Inside Drawers or Cabinets: For a completely hidden solution, place the power supply inside a drawer or cabinet. It’s crucial to drill small ventilation holes or ensure the cabinet isn’t airtight to prevent overheating.
- Under Sofas or Beds: If the LED strips are illuminating these areas, the power brick can often be tucked underneath, close to an outlet, ensuring it’s out of sight but still accessible.
Wall-Mounted Enclosures and Cord Hider Boxes
Dedicated products like wall-mounted enclosures or cord hider boxes are designed specifically to hide power bricks and excess cables. These solutions are practical and often come with features like ventilation slots.
- Plastic Enclosures: These boxes can be mounted to a wall or furniture, providing a clean cover for the power supply while allowing air circulation.
- Cord Hider Boxes: Larger boxes can accommodate multiple power bricks, controllers, and bundled wires, keeping an entire setup neat. Look for designs with subtle ventilation and easy access.
False Panels and Decorative Elements
For a bespoke solution, consider integrating the power brick into decorative elements:
- Thin Wooden Panels: A thin panel can be strategically placed to hide the brick without blocking critical airflow. This can be painted or stained to match its surroundings.
- Decorative Molding: Custom molding or trim can be designed to house the power brick, making it blend seamlessly with your room’s decor.
- Behind Wall Art: Similar to hiding wires, a strategically placed piece of wall art can serve as a removable cover for a power brick mounted on the wall.
“The magic isn’t just in hiding the strip itself, but also in hiding the power supply for a flawless finish. Always prioritize safety over aesthetics, especially concerning ventilation.”
Essential Tools and Materials for Hiding LED Wires and Power Bricks
Having the right tools and materials can make your DIY wire and power brick concealment project much easier and more professional.
- Cable Management Channels/Raceways: For organizing and protecting wires along surfaces.
- Adhesive Cable Clips/Ties: To secure wires in place and bundle excess length.
- Zip Ties/Velcro Straps: For bundling wires and securing components.
- Electrical Tape (Neutral-colored): Can help wires blend in or for minor insulation needs.
- Aluminum Channels with Diffusers: For a polished look for the LED strip itself and for routing wires.
- Cord Hider Boxes/Power Brick Enclosures: Specifically designed to conceal power supplies and controllers.
- Measuring Tape/Ruler: Essential for accurate planning and cutting.
- Scissors/Wire Cutters: For trimming LED strips and wires.
- Rubbing Alcohol and Microfiber Cloth: For cleaning surfaces before applying adhesive for better adhesion.
- Small Screwdriver (Phillips and Flathead): For opening enclosures or securing clips.
- Drill (with small bits): For creating ventilation holes or mounting enclosures if not using adhesive.
Avoiding Common Mistakes for a Flawless Finish
Even with the best intentions, certain pitfalls can compromise your LED installation. By being aware of these common mistakes, you can ensure a cleaner, safer, and more durable setup.
- Neglecting Ventilation for Power Supplies: One of the most critical safety concerns. Power bricks generate heat, and restricting airflow can lead to overheating, reducing lifespan, and posing a fire hazard. Always ensure hidden areas have ample ventilation.
- Skipping Pre-Planning: Rushing the installation without mapping out wire routes and power supply locations often leads to visible cables and an untidy look. Sketch your design, identify outlets, and test your lights before final installation.
- Poor Surface Preparation: Adhesive LED strips and cable clips require a clean, dry surface to bond effectively. Failing to clean the installation area can lead to strips and clips falling off over time.
- Overlooking Accessibility: While concealment is key, ensure you can still access power supplies and controllers for maintenance, troubleshooting, or replacement without damaging your setup.
- Placing LED Strips Too Close to Edges: This can make the individual LED dots visible rather than creating a continuous, soft glow. Install strips slightly recessed or use diffusers for a smoother effect.
- Using Non-Waterproof Solutions in Damp Areas: For kitchens, bathrooms, or outdoor installations, ensure both your LED strips and any hiding solutions are rated for moisture resistance.
Conclusion: Elevating Your LED Lighting with Seamless Integration
Transforming your space with LED strip lights goes beyond merely sticking them to a surface; it’s about creating an integrated lighting experience that enhances ambiance without visual clutter. By thoughtfully applying DIY wire and power brick concealment techniques, you can achieve a sophisticated, clean, and safe installation. From utilizing smart cable management tools to cleverly leveraging your home’s existing features, every effort contributes to a seamless finish. Embrace the challenge of hiding these components, and you’ll unlock the full aesthetic potential of your LED lighting, making it truly shine.
Ready to tackle your LED wire management project? What’s the most challenging spot in your home to hide cables?
Frequently Asked Questions
What are the best methods to hide LED strip light wires on a wall?
For walls, cable raceways or channels that can be painted to match the wall color are highly effective. Alternatively, you can run wires along the natural edges of walls, behind trim, or even tuck them behind large pieces of furniture or artwork. Adhesive cable clips can keep wires neatly secured along these paths.
Is it safe to hide LED power supplies inside a cabinet?
Yes, it can be safe to hide LED power supplies inside a cabinet, provided there is sufficient ventilation to prevent overheating. Avoid fully enclosed spaces without airflow. Consider drilling small, discreet ventilation holes or using a cabinet with existing gaps to ensure adequate heat dissipation.
Can I paint my LED wires to make them less noticeable?
Yes, painting LED wires to match the background surface can be an effective way to make them blend in and appear less noticeable, especially against solid-colored walls or furniture. Always ensure the paint is dry before handling or re-securing the wires.
What tools do I need for DIY LED wire management?
Essential tools for DIY LED wire management include cable raceways, adhesive clips, zip ties, a measuring tape, scissors, rubbing alcohol for surface preparation, and potentially a small drill for mounting enclosures or creating ventilation. Aluminum channels with diffusers are also excellent for a polished look.
How do I prevent LED strip wires from looking messy behind a TV?
Behind a TV, use cable management sleeves or wall-mounted raceways to bundle and conceal wires. Route them along the back of the TV stand or secure them to the TV mount itself. Ensure the power brick is tucked away in an entertainment center or a dedicated cord hider box with good ventilation.
What are aluminum channels used for in LED strip installations?
Aluminum channels serve multiple purposes: they house the LED strip lights for a cleaner, diffused light output, protect the strips from dust and damage, and provide a discreet channel to run their associated wires, making the entire installation look much more professional and integrated.
How can I make sure my hidden LED setup is easily accessible for maintenance?
When hiding components like power supplies, choose locations that are out of sight but still relatively easy to access. For example, behind a removable panel, inside a cabinet that opens, or using a cord hider box with a lid. This prevents the need to dismantle your entire setup for troubleshooting or replacement.